Events and Web3js
Dealing with Events really comes into play with DApps when using JavaScript (or other non-solidity languages). So, from outside of the Ethereum Sandbox.

The JavaScript Part
Consider the following Script I also readied in the JS fiddle:
It's a minimal MetaMask example, but it will get you going with web3js and MetaMask. It's the basics, so let's walk through that line-by-line before continueing - there's a lot at play here!
Checking if MetaMask is installed
if (typeof window.ethereum !== 'undefined') {
    ...
}
MetaMask injects itself into the website. Its reachable with window.ethereum. So, if the window.ethereum is not undefined, there's a good reason to believe MetaMask is installed.
Connecting a Website
MetaMask has a security procedure in place, that prevents a website reading the Address without the user giving explicit permission. This is in addition to the transaction-confirmation popups.
To trigger the initial connection you can do two things:
ethereum.request({ method: 'eth_requestAccounts' });
which either gets the accounts directly if the user already gave connection-consent.
Or you can request permissions manually, which is currently not really advised (yet?)
ethereum
    .request({
      method: 'wallet_requestPermissions',
      params: [{ eth_accounts: {} }],
    })
Using Web3js and MetaMask
After the user gave permission to read the accounts, you can use the window.ethereum as provider for web3js.
And in the web3js world, its initialized with web3 = new Web3(provider) - mind the uppercase/lowercase!
After that, you can use web3js normally.
Outputting Contract Events with Web3js
What we need for web3js to work is the contract ABI and the contract address!
In the jsfiddle, I have already provided the ABI array. What you need to do now is to
- deploy the Smart Contract on a real blockchain (like Kovan), where MetaMask is connected to
- copy the address from Remix and paste it into the address input field
- hit "Listen to Events"
- Head over to Remix and send a token (to any address)
- Observe the JSFiddle
Magic! 🪄
Okay, not so much actually. But this is how DApps can listen to changes in Smart Contracts easily.
Make sure, you are communicating to the outside world what is happening inside your Smart Contracts through events.
Event Topics, Limitations and Cost
Now you're maybe wondering, what are the limitations? And what are event topics? And are they expensive to use?
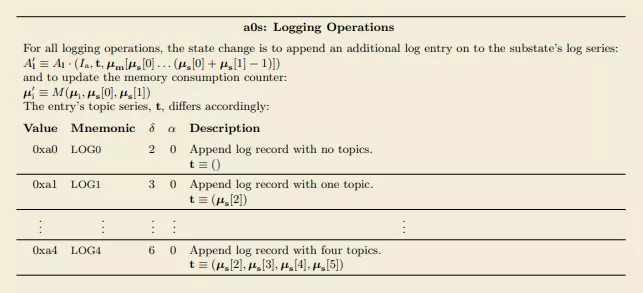
Events use the EVM opcode log0, log1, log2, log3 and log4 under the hood. The events are relatively cheap to use, compared to storing values.
Are historical events accessible?
How long events are stored, depends on future developments of the Ethereum chain. Right now, at the time of writing this text, you can access all events that ever happened on archive nodes. You can query any block and get the events. But if a chain pruninig happens some time in the futurer, events might not be accessible anymore. That's why it is maybe better to store events in a different system, such as a Database for larger DApps that depend on historical events.
The Ethereum Yellow Paper lists those op-codes on Page 36. They are talking about something called "topics". What are those?
Event Topics
Topics are used to describe events and allows to quickly go through the underlying bloom filter. If you look at raw block headers, you will see they contain a logsBloom field (which are normally decoded for you right away). If you are searching for logs, then the bloom filter efficiently does this for you and can find out which blocks contain a certain log with a certain topic.
Here is how the topics work:
The first topic is usually the Event Signature, which is the keccak256(TokensSent(address,uint256)) in our example. Then you can have up to three more indexed fields, which gives you log0 to log4.
If we filter for certain events, we can do that with JavaScript later on very efficiently:
  contractInstance.getPastEvents("TokensSent",{filter: {_to: ['0x123123123...']}, fromBlock:0 }).then(event => {
    console.log(event)
  });
}
The problem is, our smart contract specifies no indexed data yet. So, it will just output all events, because it cannot efficiently filter them.
Let's update the smart contract and add the "indexed" keyword to the event.
event TokensSent(address indexed _from, address indexed _to, uint _amount);
Remember, you can have up to 3 indexed parameters, which allow for easier filtering. You cannot filter by range (e.g. >= 5 or < 100), but you can filter by a specific value, such as a receiver address or a sender address.
Let's redeploy our smart contract and send a few tokens around and then filter by a specific address.
Checksum Address
Be careful with the checksum address. Filtering by all-lowercase addresses is not the same as filtering by checksumed addresses.
Wondering how much data you can "stuff" into Events? Quite a bit actually. You can have up to three indexed parameters, the rest will be added as "unindexed" data at the last argument concatenated together.
Cost of Events
In previous lectures we were creating a mapping with elements of Transfers for deposit and withdrawals. Doing this is not gas efficient at all. It's much much better to simply emit an event for these transactions.
As a rule of thumb, events are about 10-100x cheaper than actually storing something in storage variables.
