Modify HTML

Now it's time that we modify our HTML so we can actually interact with the Smart Contract from the Browser.
Open "client/App.js" and modify a few things inside the file:
import React, { Component } from "react";
import ItemManager from "./contracts/ItemManager.json";
import Item from "./contracts/Item.json";
import getWeb3 from "./getWeb3";
import "./App.css";

class App extends Component {
  state = {cost: 0, itemName: "exampleItem1", loaded:false};

  componentDidMount = async () => {
    try {
      // Get network provider and web3 instance.
      this.web3 = await getWeb3();

      // Use web3 to get the user's accounts.
      this.accounts = await this.web3.eth.getAccounts();

      // Get the contract instance.
      const networkId = await this.web3.eth.net.getId();

      this.itemManager = new this.web3.eth.Contract(
        ItemManager.abi,
        ItemManager.networks[networkId] && ItemManager.networks[networkId].address,
      );
      this.item = new this.web3.eth.Contract(
        Item.abi,
        Item.networks[networkId] && Item.networks[networkId].address,
      );

      this.setState({loaded:true});

    } catch (error) {
      // Catch any errors for any of the above operations.
      alert(
        `Failed to load web3, accounts, or contract. Check console for details.`,
      );
      console.error(error);
    }
  };
//.. more code here ...
Then add in a form to the HTML part on the lower end of the App.js file, in the "render" function:
render() {
if (!this.state.loaded) {
return <div>Loading Web3, accounts, and contract...</div>;
}
return (
<div className="App">
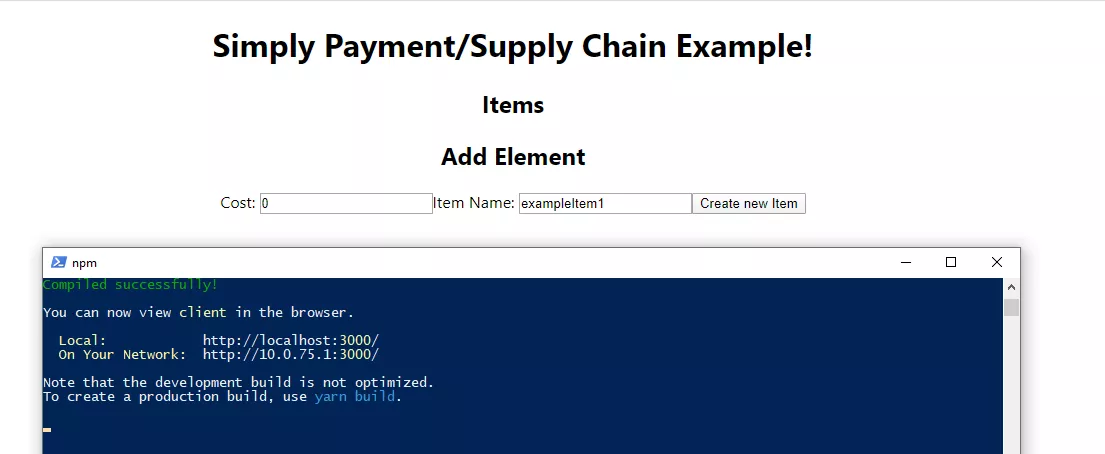
<h1>Simply Payment/Supply Chain Example!</h1>
<h2>Items</h2>
<h2>Add Element</h2>
Cost: <input type="text" name="cost" value={this.state.cost} onChange={this.handleInputChange} />
Item Name: <input type="text" name="itemName" value={this.state.itemName} onChange={this.handleInputChange} />
<button type="button" onClick={this.handleSubmit}>Create new Item</button>
</div>
);
}
And add two functions, one for handleInputChange, so that all input variables are set correctly. And one for sending the actual transaction off to the network:
handleSubmit = async () => {
    const { cost, itemName } = this.state;
    console.log(itemName, cost, this.itemManager);
    let result = await this.itemManager.methods.createItem(itemName, cost).send({ from: this.accounts[0] });
    console.log(result);
    alert("Send "+cost+" Wei to "+result.events.SupplyChainStep.returnValues._address);
  };

  handleInputChange = (event) => {
    const target = event.target;
    const value = target.type === 'checkbox' ? target.checked : target.value;
    const name = target.name;

    this.setState({
      [name]: value
    });
  }
Open another terminal/powershell (leave the one running that you have already opened with truffle) and go to the client folder and run
npm start
This will start the development server on port 3000 and should open a new tab in your browser:
See an Error?
If you see an error message that the network wasn't found or the contract wasn't found under the address provided -- don't worry: Follow along in the next step where you change the network in MetaMask! As long as there is no error in our terminal and it says "Compiled successfully" you're good to go!