Introduction
Have you ever wondered about the best approch for developing Smart Contracts?
Is it just using an editor and compiling everything manually using solc? Or is it Remix IDE, or maybe use Truffle, or maybe use Hardhat, or maybe instead use the newest one: Foundry?
In this mini-course we're developing a set of smart contracts with Remix, Truffle, Hardhat and Foundry and see what each of these Frameworks (or toolkits?) can offer us as developers.
Video Walkthrough
In you want, you can also follow the video walkthrough here:
Condensed Version
The Walk-Through here is basically the same as the video - in a condensed version. I made the video first and then, in a second version, added the walk through and it doesn't make sense to fake the problems in the video we needed to debug, etc.
Best is to watch the video for Remix, follow here for Remix, then watch Truffle, then follow here the Truffle part, then the Hardhat video, then the walkthrough and last the Foundry video and then the walk-through.
Also, I did my best add additional useful information where necessary in the written tutorial here.
What We Do
In this course we're prototyping a Staking Smart Contract in Remix and bring it over to Truffle, Hardhat and Foundry.
The staking contract functionality will consist of two ERC20 tokens, where one can mint/burn tokens from the other ERC20 contract based on a conversion rate. We will use OpenZeppelin Smart Contracts for this excercise. We will use the ERC20 contracts from OpenZeppelin, as well as the AccessControl functionality.
By running through the video, you'll learn how to use:
- Remix
- The Remix Debugger
- The Remix Scripting functionality
- Truffle Migrations
- Truffle Debugger
- Truffle Unit Tests
- Ganache
- Hardhat Scripts
- Console.log and Hardhat Node
- Hardhat Unit Tests
- Foundry installation
- Foundry VM
- Foundry Unit Tests
Remix
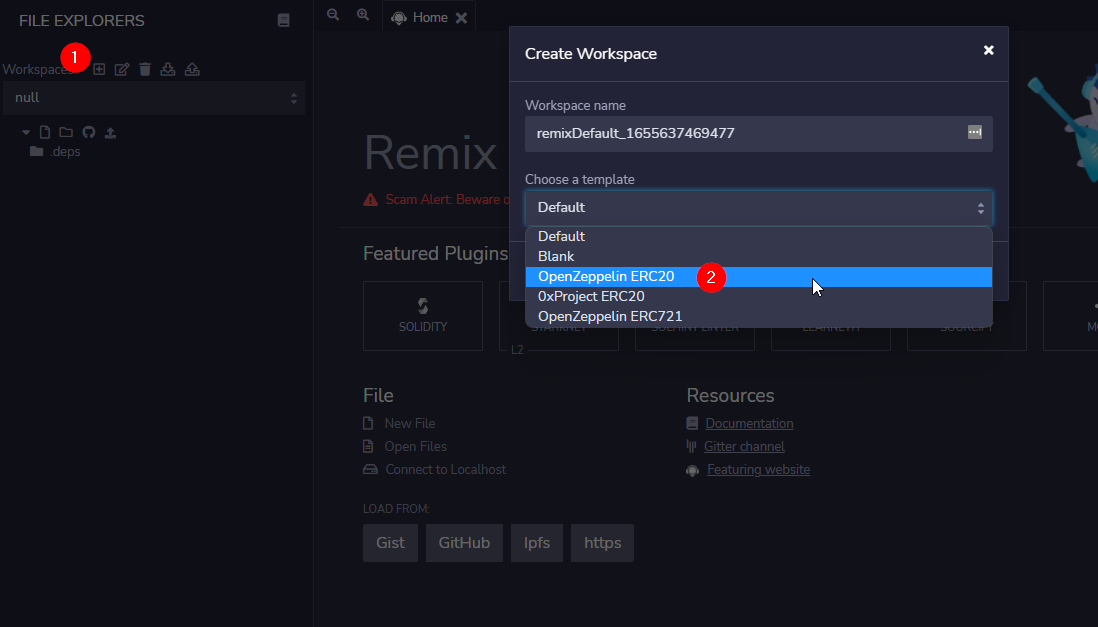
Let's get started in Remix. Open it up on http://remix.ethereum.org.
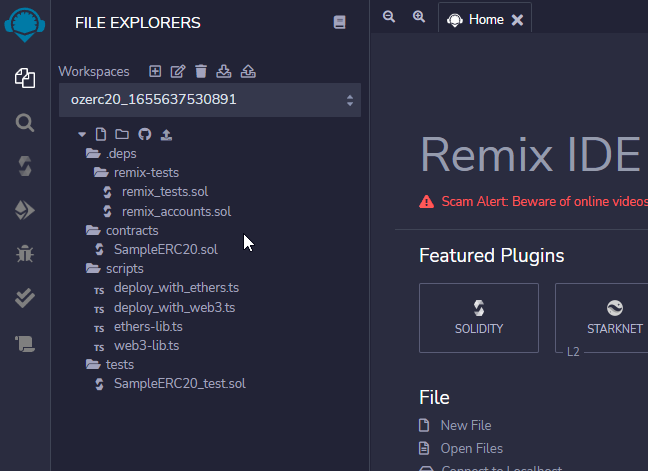
Create a new Workspace, but choose the Openzeppelin Template
It will come with an ERC20 Token pre configured, as well as the deployment scripts for Web3 and Ethers.js:
Configuring the SampleToken
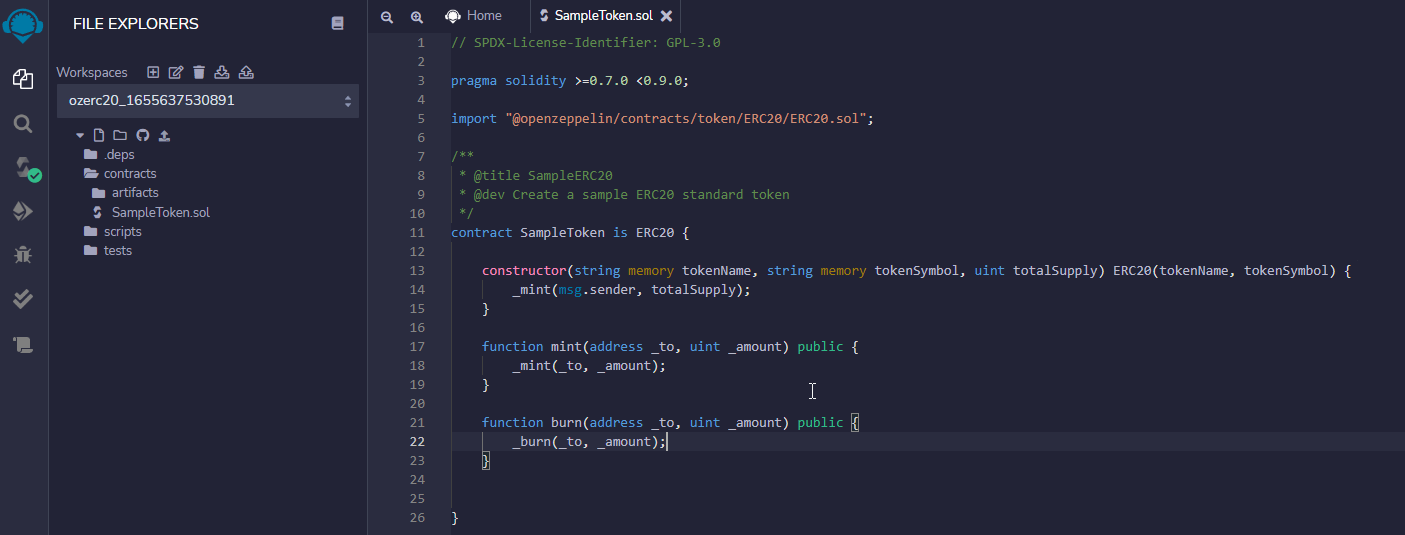
Delete the existing Smart Contract in the contracts folder and a new Smart Contract named "SampleToken.sol" to the contracts folder, with the following code:
// SPDX-License-Identifier: GPL-3.0

pragma solidity >=0.7.0 <0.9.0;

import "@openzeppelin/contracts/token/ERC20/ERC20.sol";

/**
 * @title SampleERC20
 * @dev Create a sample ERC20 standard token
 */
contract SampleToken is ERC20 {

    constructor(string memory tokenName, string memory tokenSymbol, uint totalSupply) ERC20(tokenName, tokenSymbol) {
        _mint(msg.sender, totalSupply);
    }

    function mint(address _to, uint _amount) public {
        _mint(_to, _amount);
    }

    function burn(address _to, uint _amount) public {
        _burn(_to, _amount);
    }

}
It should look like this:
Right now everone can mint and burn tokens, which is not good, let's add an access control to it:
// SPDX-License-Identifier: GPL-3.0

pragma solidity >=0.7.0 <0.9.0;

import "@openzeppelin/contracts/token/ERC20/ERC20.sol";
import "@openzeppelin/contracts/access/AccessControl.sol";

/**
 * @title SampleERC20
 * @dev Create a sample ERC20 standard token
 */
contract SampleToken is ERC20, AccessControl {
        bytes32 public constant MINTERROLE = keccak256("MINTERROLE");
        bytes32 public constant BURNERROLE = keccak256("BURNERROLE");

    constructor(string memory tokenName, string memory tokenSymbol, uint totalSupply) ERC20(tokenName, tokenSymbol) {
        _mint(msg.sender, totalSupply);
        _setupRole(DEFAULT_ADMIN_ROLE, msg.sender);
    }

    function mint(address _to, uint _amount) public {
        require(hasRole(MINTERROLE, msg.sender), "SampleToken: You do not have the minter role");
        _mint(_to, _amount);
    }

    function burn(address _to, uint _amount) public {
        require(hasRole(BURNERROLE, msg.sender), "SampleToken: You do not have the burner role");
        _burn(_to, _amount);
    }
}
Auto Import
With the "auto-import" functionality, its super easy to just add a new import ... line in the smart contracts and Remix automatically downloads the packages.
This is super handy during Prototyping.
Now, we haven't deployed anything. Let's do this first manually and then via scripts!
Deployment with Remix
To manually deploy smart contracts...
- Head over to the "Deploy and Run Transactions" tab
- Select the Smart Contract you want to deploy
- And select the "SampleToken" Smart Contract
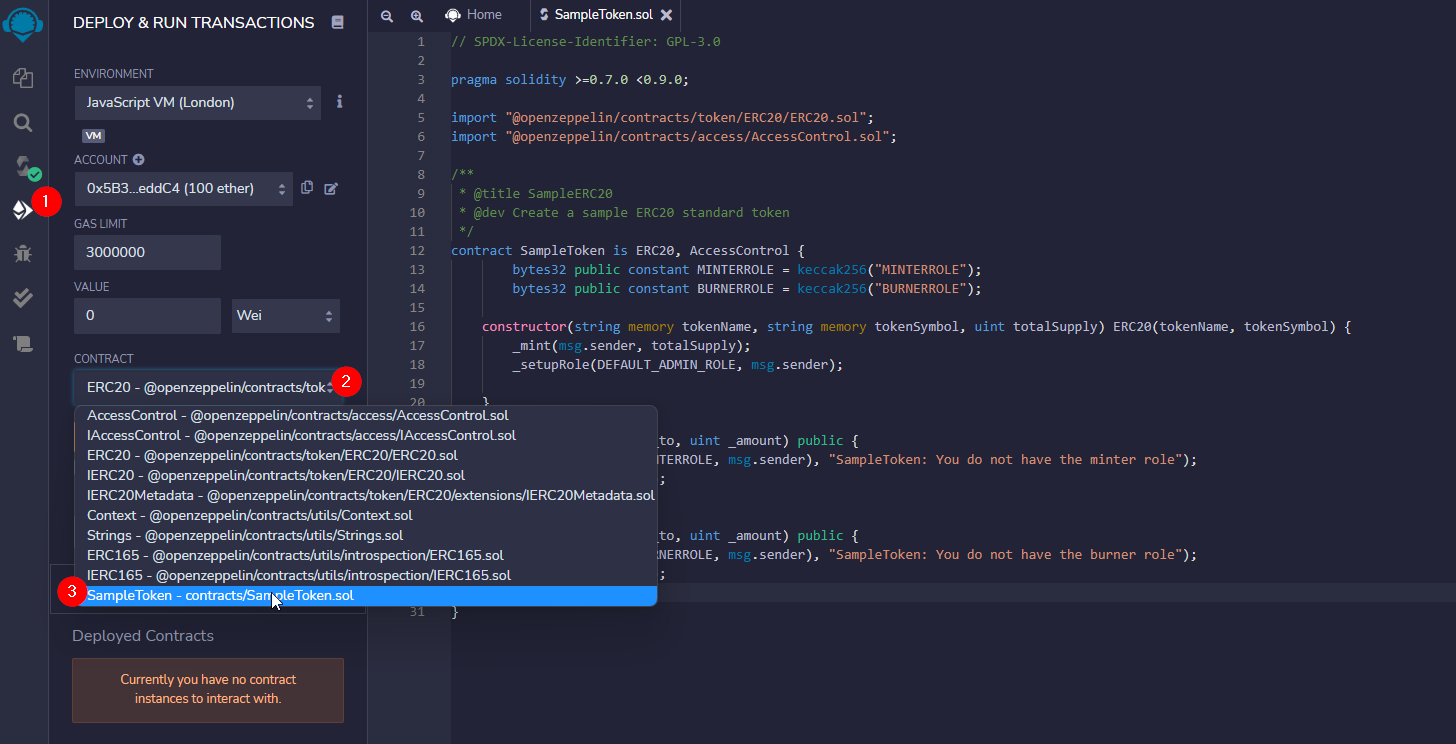
In the deployment arguments write "Sample Token", "TOK" and 100000000000

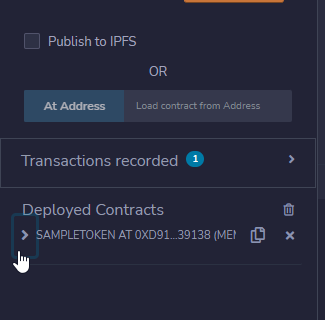
And you get a new Instance below.
For now that is fine, but if we add more contracts we should script it. Let's add the Staking Token before scripting the deployment.
Adding the Staking Contract
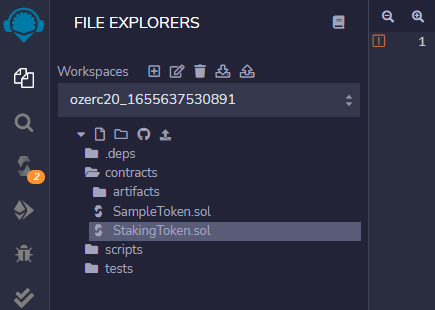
Add a new file to Remix and call it "StakingToken.sol" in the contracts folder:
Then add the following code:
// SPDX-License-Identifier: GPL-3.0

pragma solidity >=0.7.0 <0.9.0;

import "@openzeppelin/contracts/token/ERC20/ERC20.sol";
import "./SampleToken.sol";

/**
 * @title SampleERC20
 * @dev Create a sample ERC20 standard token
 */
contract StakingToken is ERC20 {

    uint public deployTimestamp;

    SampleToken sampleToken;
    constructor(string memory tokenName, string memory tokenSymbol, address _sampleToken) ERC20(tokenName, tokenSymbol) {
        deployTimestamp = block.timestamp;
        sampleToken = SampleToken(_sampleToken);
    }

    function stake(uint amountInTok) public {
        uint amountInSta = amountInTok / (((block.timestamp - deployTimestamp) / 1 hours) + 1);
        sampleToken.burn(msg.sender, amountInTok);
        _mint(msg.sender, amountInSta);
    }

    function unstake(uint amountInSta) public {
        uint amountInTok = amountInSta * (((block.timestamp - deployTimestamp) / 1 hours) + 1);
        sampleToken.mint(msg.sender, amountInTok);
        _burn(msg.sender, amountInSta);
    }

    function _beforeTokenTransfer(address from, address to, uint256 amount) override internal {
        require(from == address(0) || to == address(0), "Staking: Transfer is not possible");
        super._beforeTokenTransfer(from, to, amount);
    }

}
Just to explain how that works:
If someone stakes, the amount of tokens are dependent on how much time passed. And if he unstakes the conversion rate is again dependent on how much time passed.
Production
The conversion rate is something you have to determine yourself for your own token project! Also, always do an audit from your contracts before putting them into production. I am not liable for any damages resulting from unprofessional behavior on your side...
Scripting Deployment with Remix
Now, let's test this too, but instead of manually clicking through the interface, let's automate this:
- Deploy the Sample Token (TOK)
- Deploy the Staking Token (STA) with the TOK Address
- Give the STA Token permission to mint and burn on TOK
In /scripts/deploy_with_web3.ts you find a sample deployment script. Let's extend that with:
import { deploy } from './web3-lib'

import Web3 from 'web3'

(async () => {
    try {
        const sampleToken = await deploy('SampleToken', ['SampleToken', 'TOK', (100e18).toString()])
        console.log(`address: ${sampleToken.options.address}`)
        const resultStaking = await deploy('StakingToken', ['StakingToken', 'STA', sampleToken.options.address]);
        const web3 = new Web3(web3Provider)
        const accounts = await web3.eth.getAccounts()
        await sampleToken.methods.grantRole(await sampleToken.methods.MINTERROLE().call(), resultStaking.options.address).send({from: accounts[0]});
        await sampleToken.methods.grantRole(await sampleToken.methods.BURNERROLE().call(), resultStaking.options.address).send({from: accounts[0]});
    } catch (e) {
        console.log(e.message)
    }
})()
And, since scripts/web3-lib.ts is normally just handling back the options instead of the full contract instance, let's change the file too:
- change that it returns a contract instance
- change the default gas to 5.5 million
import Web3 from 'web3'
import { Contract, ContractSendMethod, Options } from 'web3-eth-contract'

/**
 * Deploy the given contract
 * @param {string} contractName name of the contract to deploy
 * @param {Array<any>} args list of constructor' parameters
 * @param {string} from account used to send the transaction
 * @param {number} gas gas limit
 * @return {Options} deployed contract
 */
export const deploy = async (contractName: string, args: Array<any>, from?: string, gas?: number): Promise<Contract> => {

    const web3 = new Web3(web3Provider)
    console.log(`deploying ${contractName}`)
    // Note that the script needs the ABI which is generated from the compilation artifact.
    // Make sure contract is compiled and artifacts are generated
    const artifactsPath = `browser/contracts/artifacts/${contractName}.json`

    const metadata = JSON.parse(await remix.call('fileManager', 'getFile', artifactsPath))

    const accounts = await web3.eth.getAccounts()

    const contract: Contract  = new web3.eth.Contract(metadata.abi)

    const contractSend: ContractSendMethod = contract.deploy({
        data: metadata.data.bytecode.object,
        arguments: args
    })

    const newContractInstance = await contractSend.send({
        from: from || accounts[0],
        gas: gas || 5500000
    })
    return newContractInstance
}
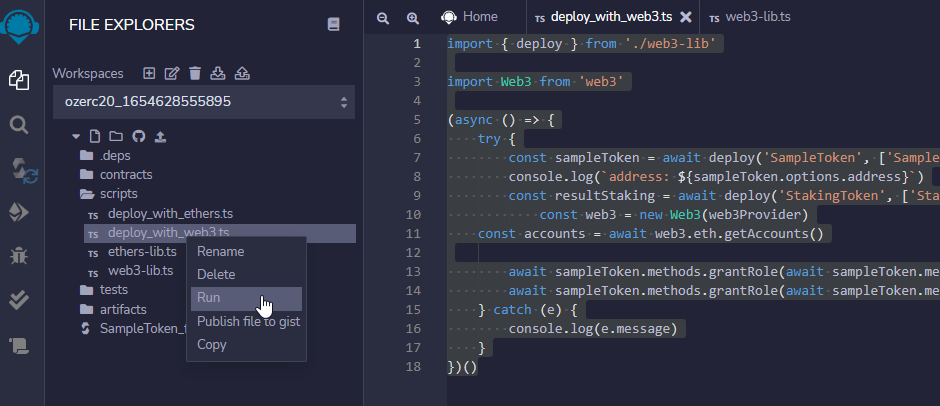
Let's see if we can run this! Right click the script and hit "run":
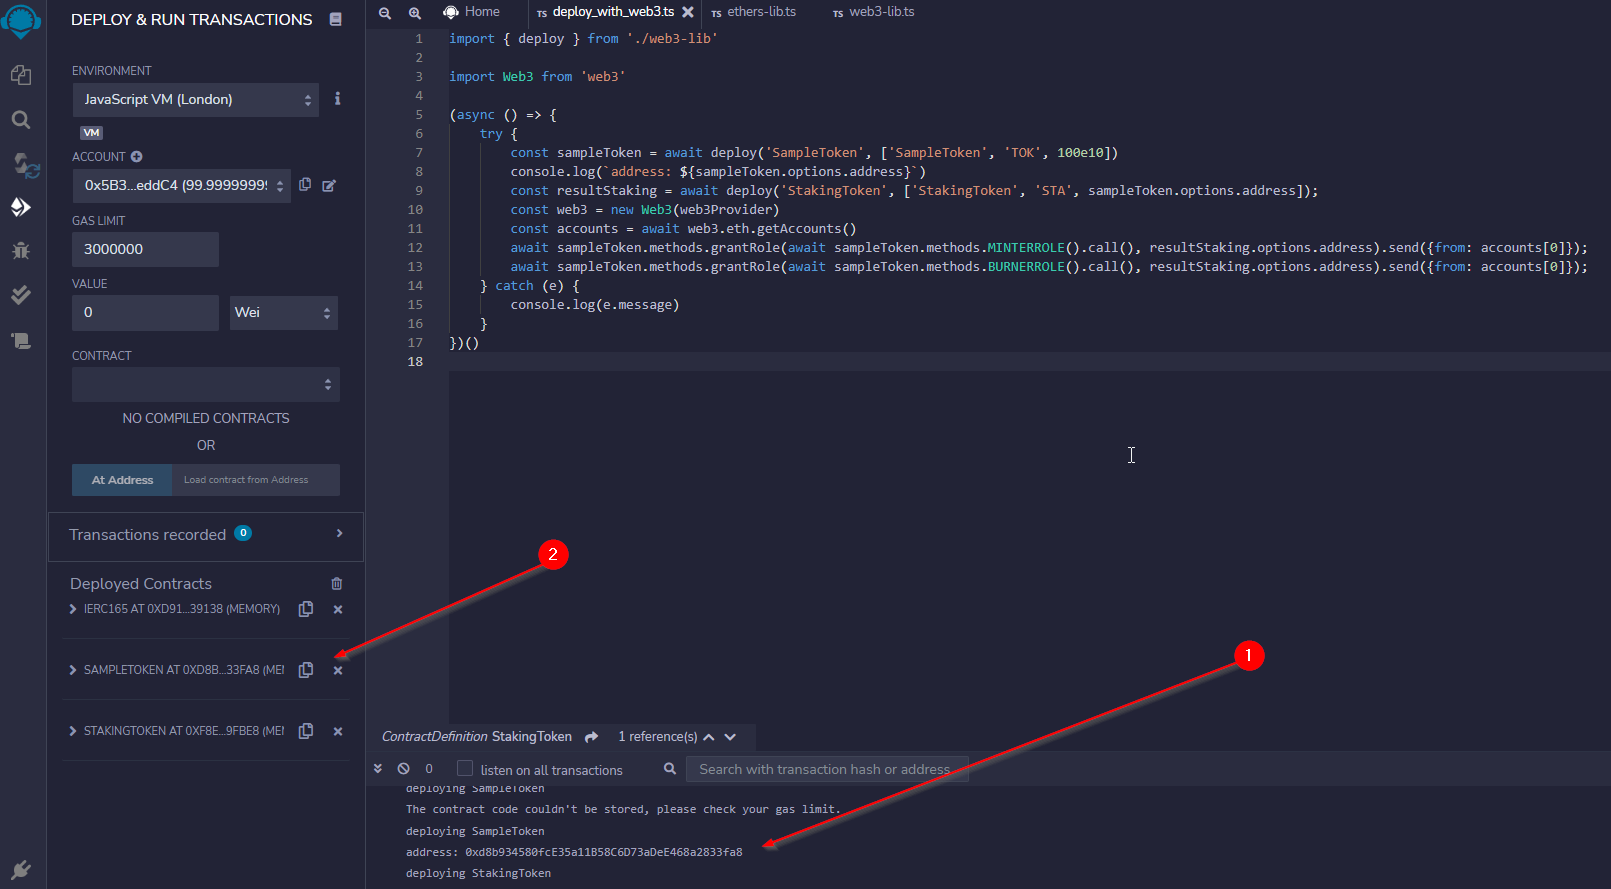
You should see two things happening:
- the contracts are getting deployed
- When you go over to the Deploy & Run Transactions tab, you get the contract instances
Difference to Video
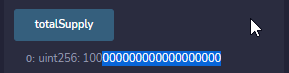
In the video I was doing 1000000000 Total supply. In the later section of the video I actually used 50 * 10e18, which is actually 500e18 (500 and 18 zeroes). Why? Because the decimals are set to 18 decimals by default for ERC20 tokens. So, the total supply might be 10000000, but its actually 0.00000000001 tokens, accounting for the decimals.
100e18 would be 100 tokens with 18 zeroes reserved for decimals.
Now we can stake and unstake!
Testing Staking
In Remix I still test everything manually. I am aware that you can unit-test now inside Remix as well, but I haven't gotten this far yet. So, for this test run, we're using manual testing.
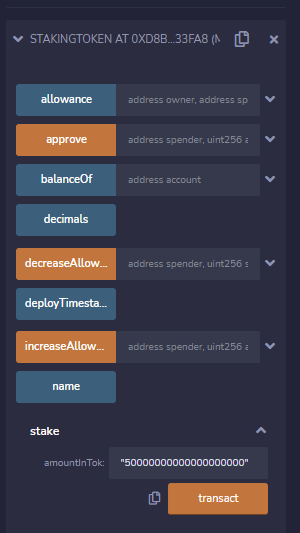
In this case, we're going to stake 50 tokens, then we're going to look at the balance of STA and then unstake the 50 tokens again.
Conversion to 18 Decimals
To stop counting the decimals, you could use web3.utils.toWei("50","ether"); on the console interface there to get the correct amount with 18 decimals:
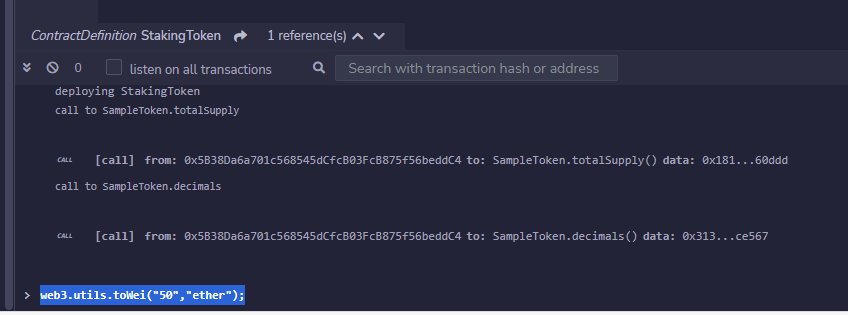
or simply type in 50e18:

Then paste this into the staking field:
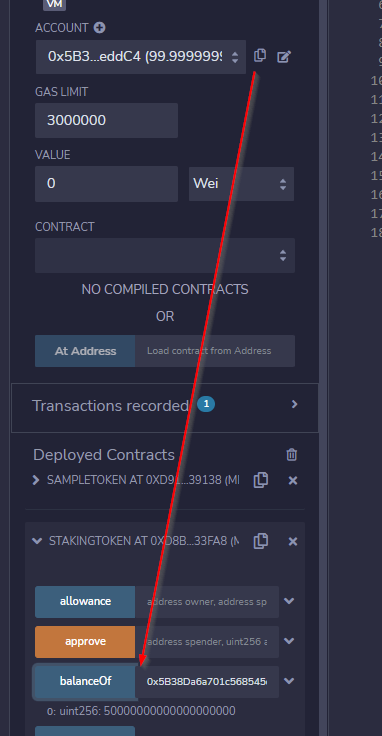
Make sure you have the correct balance:
Then unstake again:

Well, that's it. If you have watched the video, then you also know how to use the Remix debugger. That's enough for the text-walkthrough though, let's go on and move everything to Truffle!
Truffle
First thing is to install truffle, if you haven't.
npm install -g truffle
This will install truffle globally, so, on any terminal or command line you can simply type "truffle".
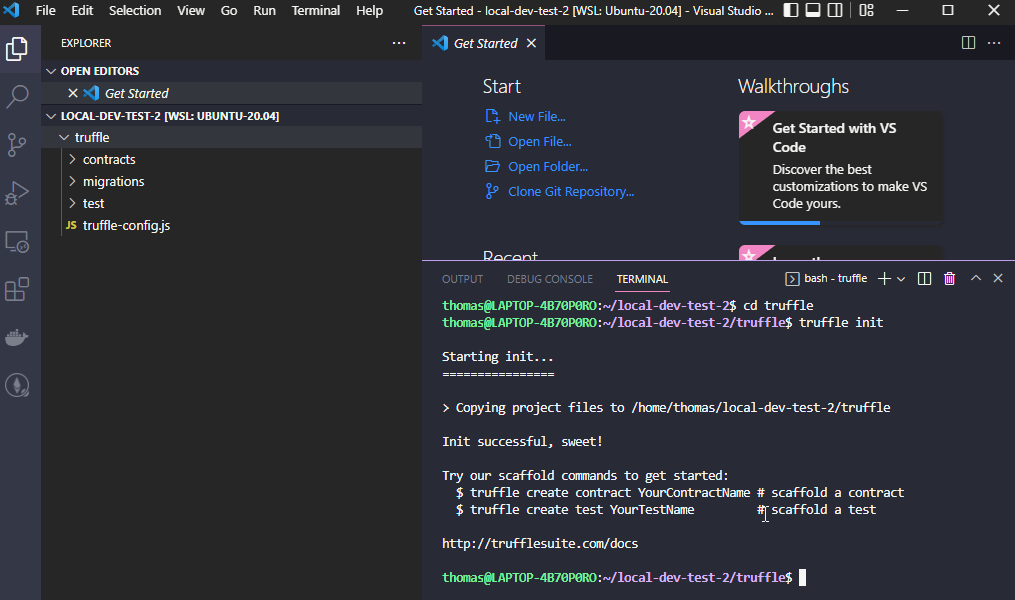
Next, we'll initialize a new truffle directory somewhere. Open a terminal, create an empty directory named "truffle".
Then open VScode into it:
code .
Open a new Terminal, switch to the truffle subdirectory and type in
cd truffle
truffle init
which will download the init-package from Truffle. It basically contains a migrations contract and the scaffolding.
Then add the two SampleToken.sol and StakingToken.sol into the contracts folder:
// SPDX-License-Identifier: GPL-3.0

pragma solidity >=0.7.0 <0.9.0;

import "@openzeppelin/contracts/token/ERC20/ERC20.sol";
import "@openzeppelin/contracts/access/AccessControl.sol";

/**
* @title SampleERC20
* @dev Create a sample ERC20 standard token
*/
contract SampleToken is ERC20, AccessControl {
        bytes32 public constant MINTERROLE = keccak256("MINTERROLE");
        bytes32 public constant BURNERROLE = keccak256("BURNERROLE");

    constructor(string memory tokenName, string memory tokenSymbol, uint totalSupply) ERC20(tokenName, tokenSymbol) {
        _mint(msg.sender, totalSupply);
        _setupRole(DEFAULT_ADMIN_ROLE, msg.sender);
    }

    function mint(address _to, uint _amount) public {
        require(hasRole(MINTERROLE, msg.sender), "SampleToken: You do not have the minter role");
        _mint(_to, _amount);
    }

    function burn(address _to, uint _amount) public {
        require(hasRole(BURNERROLE, msg.sender), "SampleToken: You do not have the burner role");
        _burn(_to, _amount);
    }
}
// SPDX-License-Identifier: GPL-3.0

pragma solidity >=0.7.0 <0.9.0;

import "@openzeppelin/contracts/token/ERC20/ERC20.sol";
import "./SampleToken.sol";

/**
* @title SampleERC20
* @dev Create a sample ERC20 standard token
*/
contract StakingToken is ERC20 {

    uint public deployTimestamp;

    SampleToken sampleToken;
    constructor(string memory tokenName, string memory tokenSymbol, address _sampleToken) ERC20(tokenName, tokenSymbol) {
        deployTimestamp = block.timestamp;
        sampleToken = SampleToken(_sampleToken);
    }

    function stake(uint amountInTok) public {
        uint amountInSta = amountInTok / (((block.timestamp - deployTimestamp) / 1 hours) + 1);
        sampleToken.burn(msg.sender, amountInTok);
        _mint(msg.sender, amountInSta);
    }

    function unstake(uint amountInSta) public {
        uint amountInTok = amountInSta * (((block.timestamp - deployTimestamp) / 1 hours) + 1);
        sampleToken.mint(msg.sender, amountInTok);
        _burn(msg.sender, amountInSta);
    }

    function _beforeTokenTransfer(address from, address to, uint256 amount) override internal {
        require(from == address(0) || to == address(0), "Staking: Transfer is not possible");
        super._beforeTokenTransfer(from, to, amount);
    }

}
If you then try to compile the smart contracts, it errors out:
truffle compile
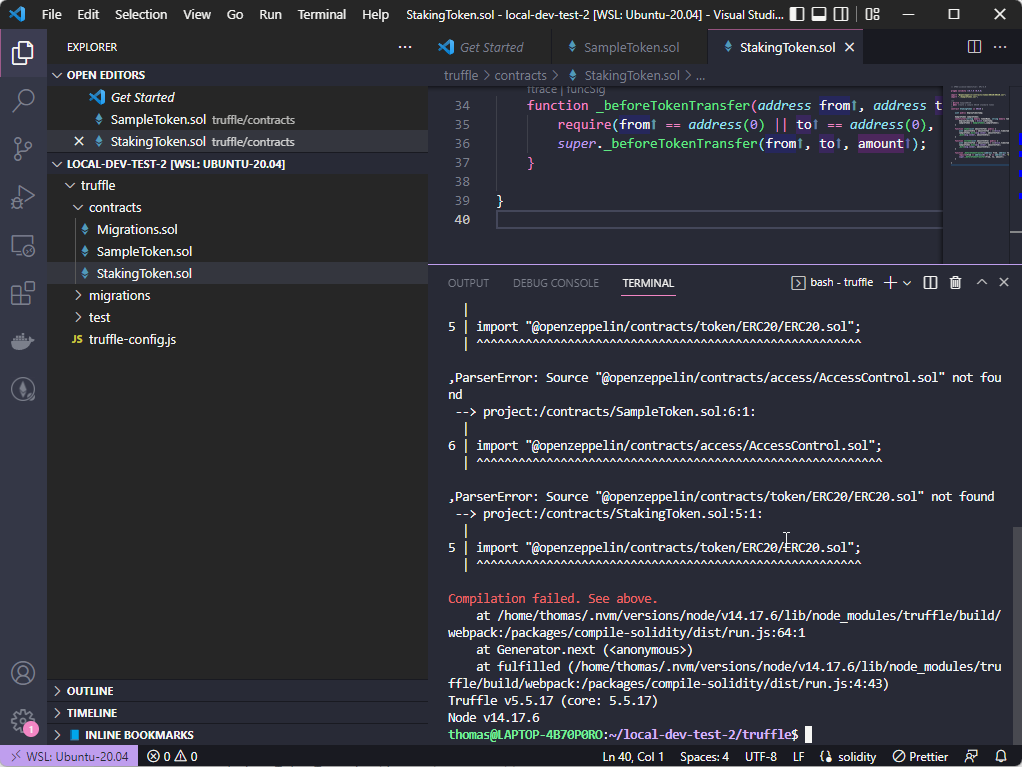
That is, because we need to add the openzeppelin smart contracts from npm first.
Adding External Packages
In Truffle you add packages through npm (EthPM is down for me?!). So, ideally you save those in a package.json file for other team members.
Let's init an empty package.json file and install openzeppelin contracts, needed by our Tokens:
npm init -y
npm install --save @openzeppelin/contracts
Now you can probably go ahead and compile the contracts:
truffle compile
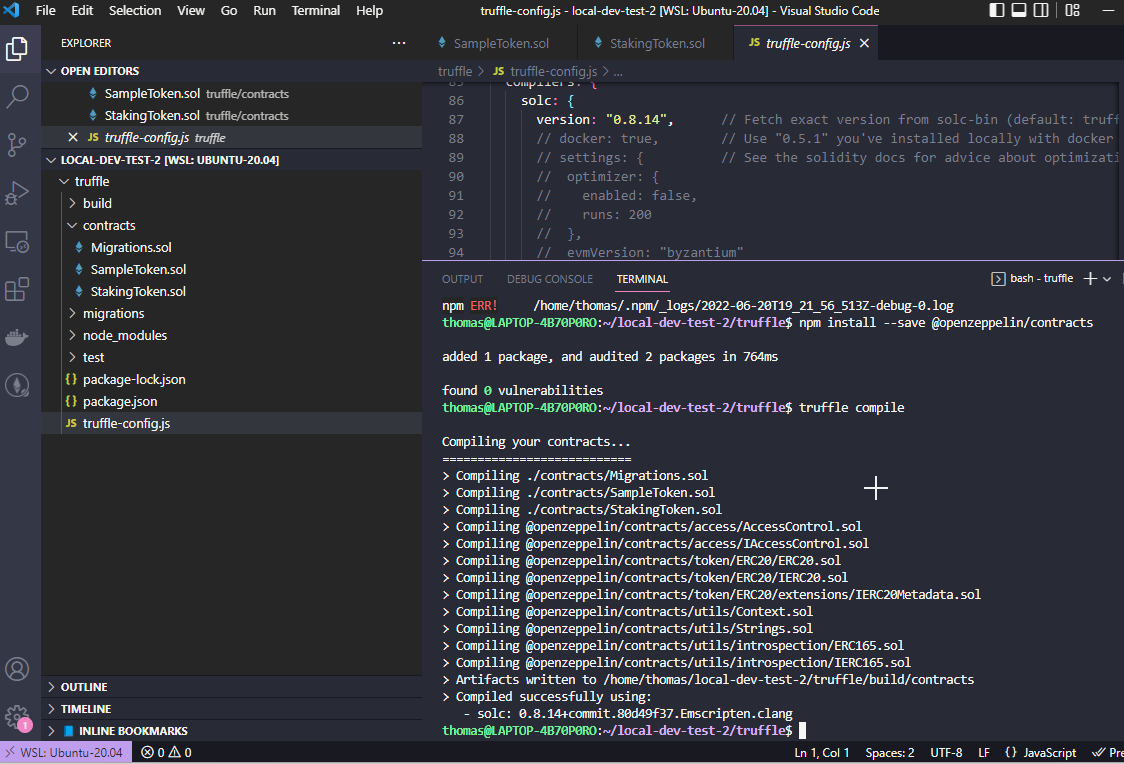
Solidity Version
If you get an error because of the Solidity compiler version, try adjusting the right compiler version in truffle-config.json
Deploy Contracts with Truffle
In truffle contract deployments are scripted using so called migrations files. In hardhat you have to manage the contract addresses yourself, Truffle manages this for you.
Let's have a look how this works:
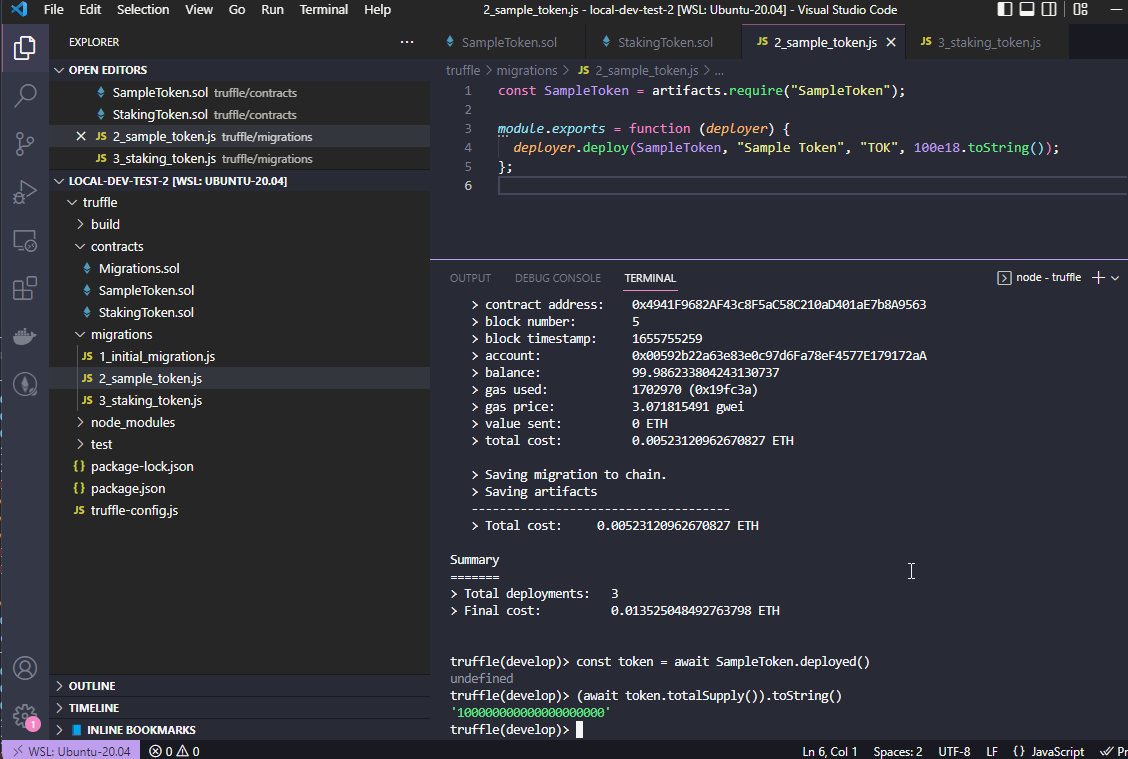
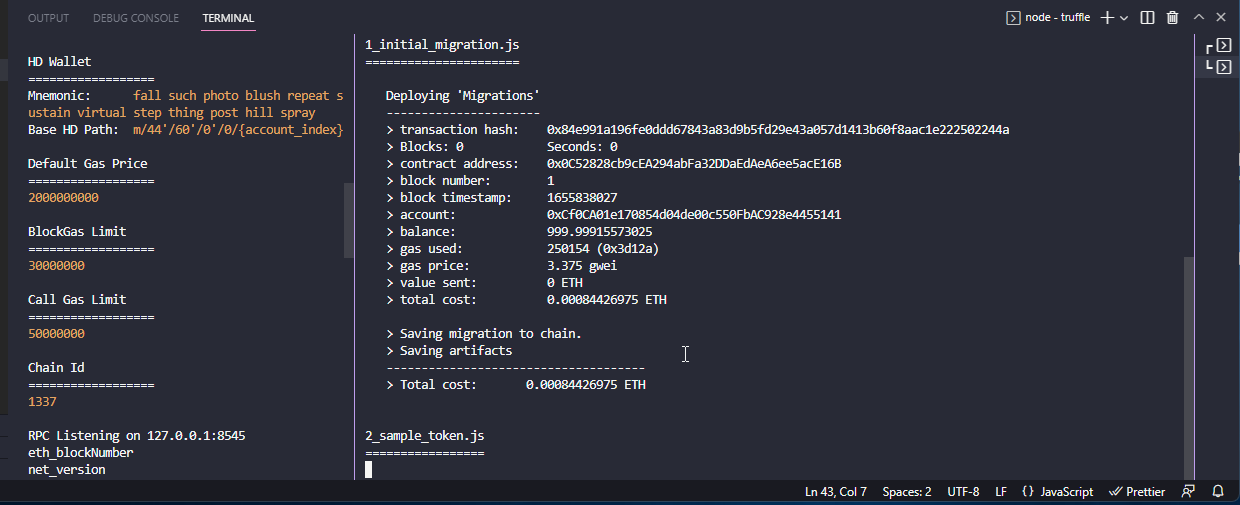
In the migrations folder, you find the javascript-migrations files. Add one for the SampleToken and one for the StakingToken:
const SampleToken = artifacts.require("SampleToken");

module.exports = function (deployer) {
deployer.deploy(SampleToken, "Sample Token", "TOK", 100e18.toString());
};
const StakingToken = artifacts.require("StakingToken");
const SampleToken = artifacts.require("SampleToken");

module.exports = async function (deployer) {

const sampleToken = await SampleToken.deployed();
await deployer.deploy(StakingToken, "Staking Token", "STA", sampleToken.address);

const stakingToken = await StakingToken.deployed();
await sampleToken.grantRole(await sampleToken.MINTERROLE(), stakingToken.address);
await sampleToken.grantRole(await sampleToken.BURNERROLE(), stakingToken.address);

};
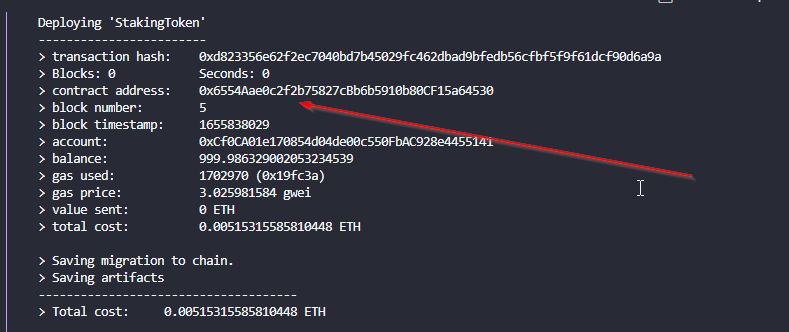
Then open a dev environment in one terminal and run the migrations:
truffle development
migrate
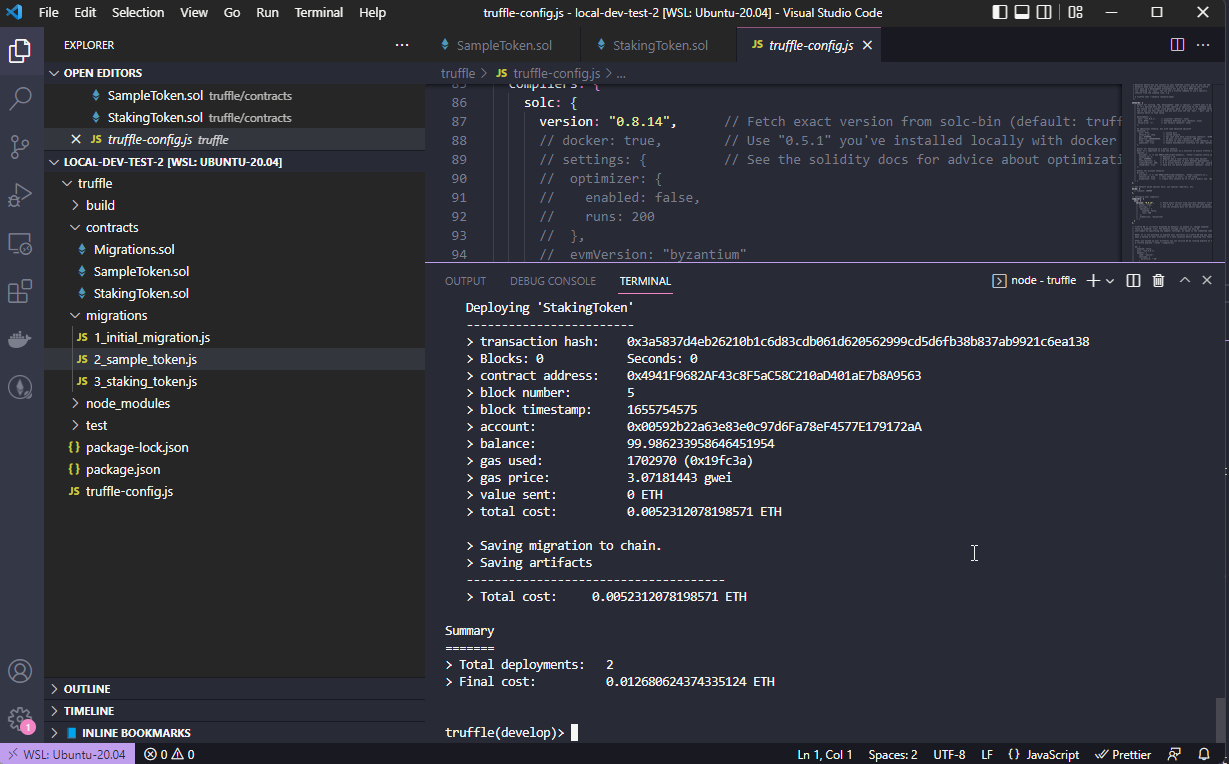
Now you can interact with the deployed instances of the contracts:
const token = await SampleToken.deployed();
(await token.totalSupply()).toString();
That should give you the total token amount (with 18 decimals).
Let's see if we can stake...
const staking = await StakingToken.deployed();
staking.stake(web3.utils.toWei("50","ether"));
(await staking.balanceOf(accounts[0])).toString();
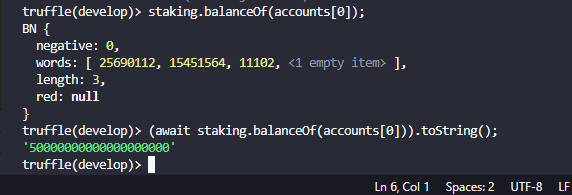
Perfect, and unstake?
staking.unstake(web3.utils.toWei("50","ether"));
Truffle will output the full results object:

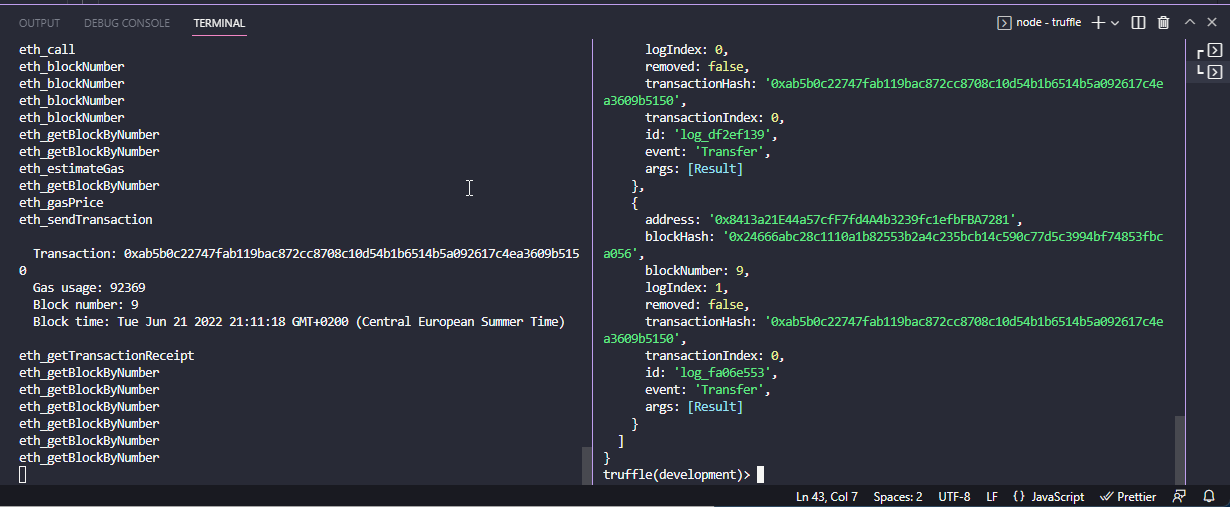
Now that we know this works, let's add a Unit test!
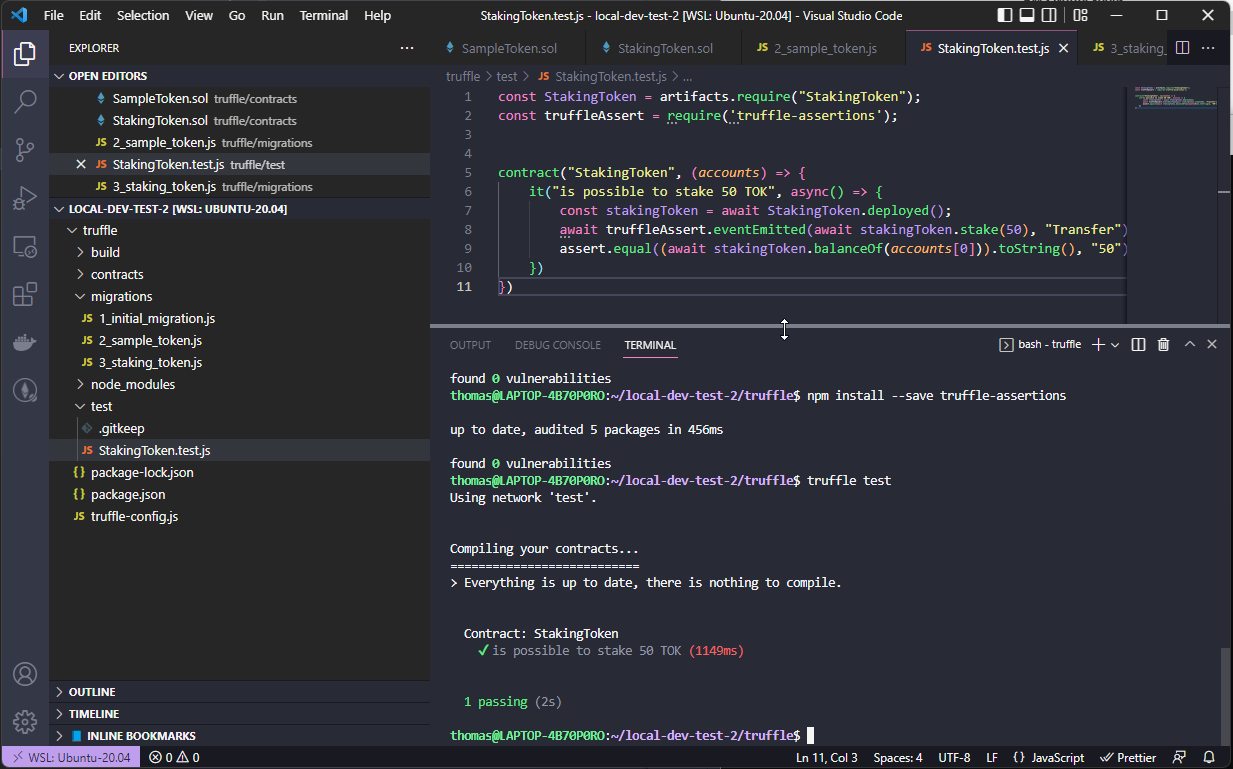
Adding Truffle Unit Tests
Unit tests in Truffle can be written in Solidity and JavaScript. There are few pros and cons' writing them directly in Solidtiy or JS. For example, if you are looking to write a set of Unit Tests to help Frontend-Devs with the right calls, or maybe want to test 3rd party JS libraries, then its better to test JavaScript against Solidity. If you are writing your tests to test functions and their input/output, then its better to test Solidity directly.
For this, we're going to write a simple JavaScript test, and we're testing exactly what we did in the Truffle Console. Add a new file "StakingToken.test.js" in the "test" folder, and add the following test:
const StakingToken = artifacts.require("StakingToken");
const truffleAssert = require('truffle-assertions');


contract("StakingToken", (accounts) => {
    it("is possible to stake 50 TOK", async() => {
        const stakingToken = await StakingToken.deployed();
        await truffleAssert.eventEmitted(await stakingToken.stake(50), "Transfer");
        assert.equal((await stakingToken.balanceOf(accounts[0])).toString(), "50");
    })
})
If you run truffle test, this will error out, because you need to install truffle-assertions:
npm install --save truffle-assertions
And then simply run
truffle test
Using Ganache and MetaMask in tandem
The last thing is, we want to use Ganache - the recommended development chain - for deployment and then import our tokens to MetaMask!
Let's install ganache cli:
npm install -g ganache
Then open the truffle-config.js file and uncomment the networks part for "development":
    development: {
     host: "127.0.0.1",     // Localhost (default: none)
     port: 8545,            // Standard Ethereum port (default: none)
     network_id: "*",       // Any network (default: none)
    },
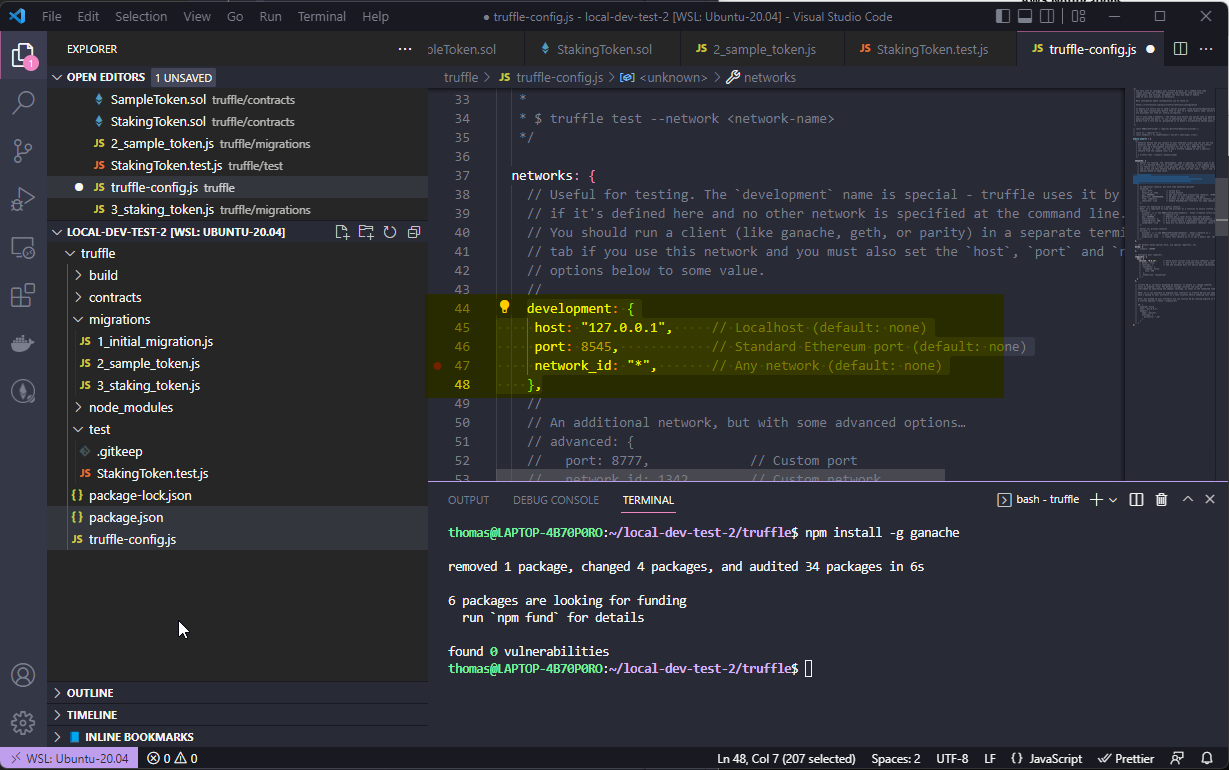
Then start ganache cli
ganache
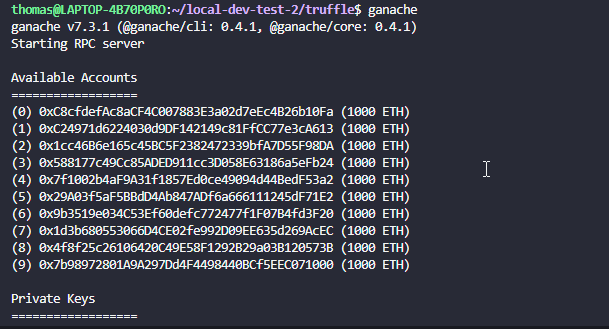
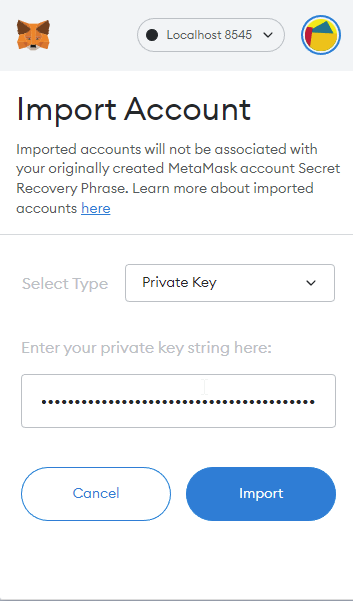
If gives your 10 accounts with 1000 ETH each. Scroll down to the first Private Key and copy it.
Then open MetaMask and import the Private key there:
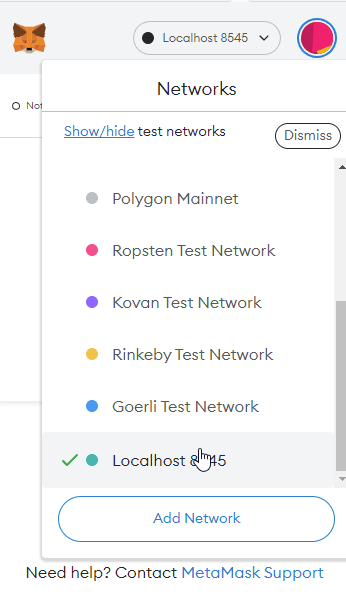
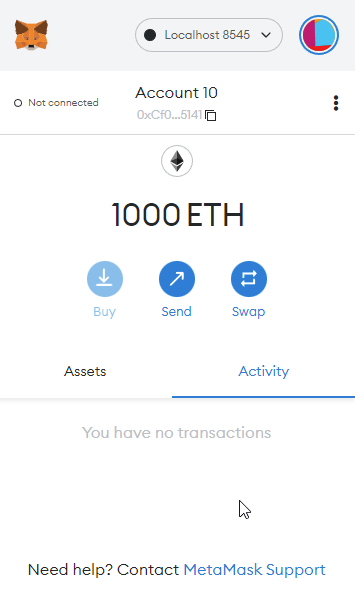
And switch over to the Localhost chain:
You should see 1000 ETH:
Add Network
If you don't see the localhost:8545 network, simply add it: http://localhost:8545 ChainID: 1337
Then open the console:
truffle console --network development
and hit
migrate
This will deploy the smart contracts to ganache!
Now you can add the two tokens to MetaMask! Make note of the Contract-Address during deployment:
Copy it from the console and add it to MetaMask as a new Token:

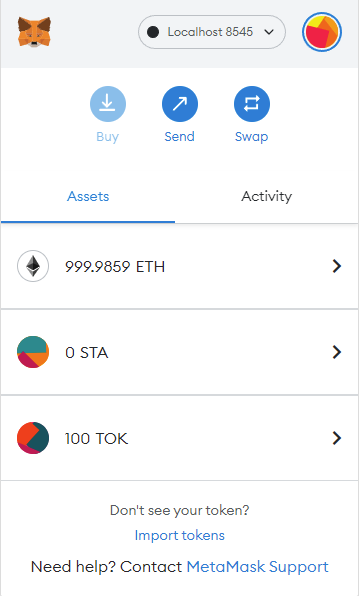
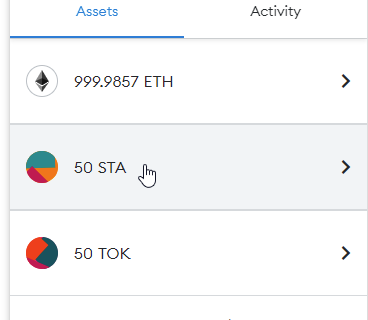
Then stake 50 tokens:
let staking = await StakingToken.deployed();
staking.stake(50e18.toString());
And it should pop up in MetaMask:
This concludes our journey to Truffle. If you are interested in more, like debugging, watch the video.
Hardhat
Hardhat is installed as a dev-dependency, not a global executable.
Let's create a new folder, initialize an empty node project and install hardhat:
mkdir hardhat
cd hardhat
npm init -y
npm install --save-dev hardhat
then you can start hardhat and will be greeted with the iconic hardhat banner and assistant
npx hardhat
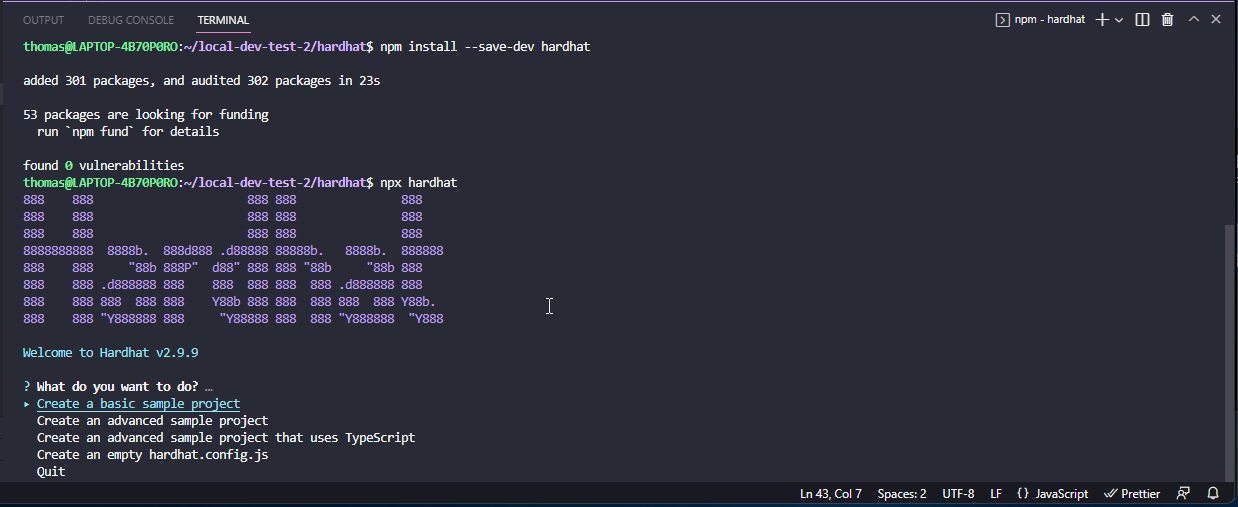
You can select the Basic Project sample and say yes to everything:

By default there will be a greeter project.
Adding Smart Contracts to Hardhat
Let's add our Smart Contracts to Hardhat. We can copy the contracts over from Truffle to Hardhat, to the "contracts" folder, and delete the "Greeter.sol":
If you type in
npx hardhat compile
you will get an error, because the openzeppelin contracts are missing, so let's add those too:
npm install --save openzeppelin/contracts
Then you can run
npx hardhat compile

Deploying and Interacting with Smart Contracts in Hardhat
Like Truffle, also Hardhat has a console. You can reach it via
npx hardhat console
The console is very powerful and Smart contacts are compiled before the console opens. But Hardhat does not have any migrations management. So you need to take care of that yourself first. So, close the console and let's add a script that does the deployment for us.
First, delete the scripts/sample-script.js, you won't need it anymore.
Then add the following file in "scripts/deployTokens-script.js":
async function main() {
const SampleToken = await ethers.getContractFactory("SampleToken");
const sampleToken = await SampleToken.deploy("Sample Token", "TOK", (50 * 10e18).toString());
await sampleToken.deployed();


const StakingToken = await ethers.getContractFactory("StakingToken");
const stakingToken = await StakingToken.deploy("Staking Token", "STA", sampleToken.address);
await stakingToken.deployed();

const grantBurnTx = await sampleToken.grantRole(await sampleToken.BURNERROLE(), stakingToken.address);
await grantBurnTx.wait();


const grantMintTx = await sampleToken.grantRole(await sampleToken.MINTERROLE(), stakingToken.address);
await grantMintTx.wait();

const stakeFiftyTx = await stakingToken.stake((5*10e18).toString());

// // wait until the transaction is mined
await stakeFiftyTx.wait();


console.log("StakingToken deployed to:", stakingToken.address);
console.log("SampleToken deployed to:", sampleToken.address);
}

// We recommend this pattern to be able to use async/await everywhere
// and properly handle errors.
main()
.then(() => process.exit(0))
.catch((error) => {
    console.error(error);
    process.exit(1);
});
Alright, let's run this:
npx hardhat run scripts/deployTokens-script.js
If you run it like this, then hardhat will start a dev-network, deploy the tokens and tear it down again. Which is not very useful for our purposes.

Instead what we need is a hardhat node: Like Ganache, a node that let's you connect to it and deploy stuff.
Start it in a new terminal with
npx hardhat node

Then run in the other terminal:
npx hardhat run --network localhost scripts/deployTokens-script.js
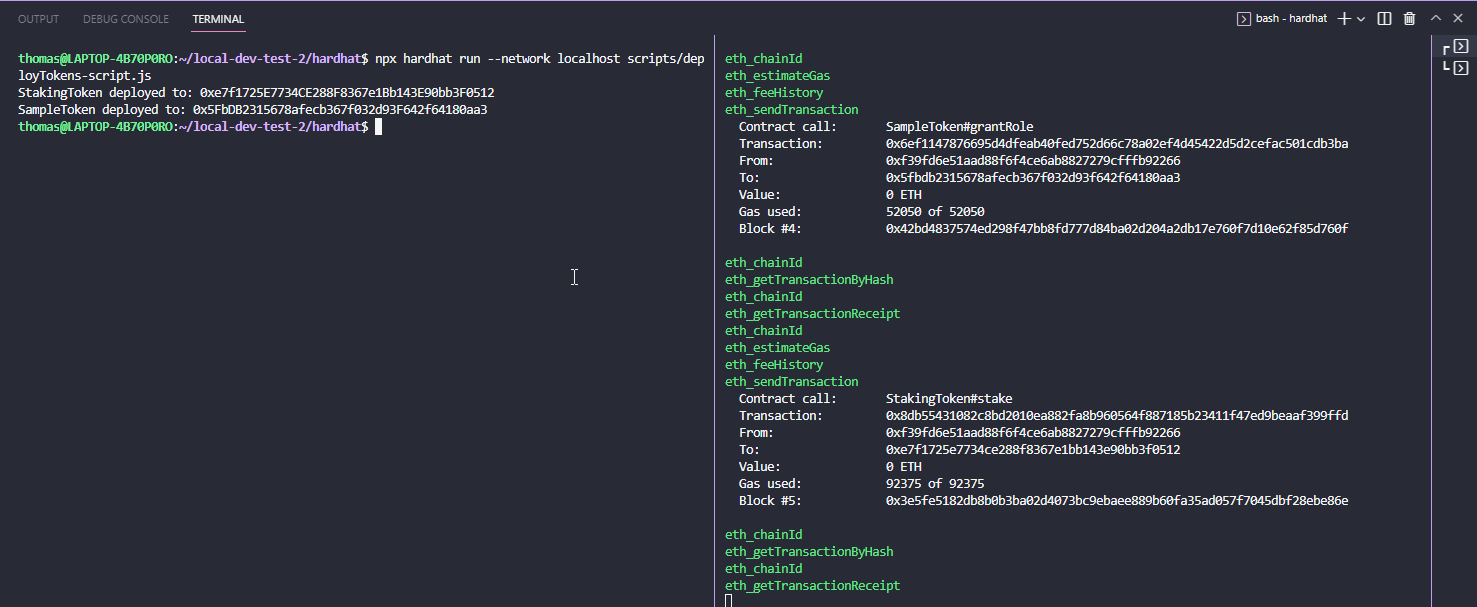
And now you see that the tokens are deployed to a network that keeps the information as long as its running - like Ganache! But it can also do more, like the famous console.log - something hardhat is very famous for. Watch the full video to see how that works!
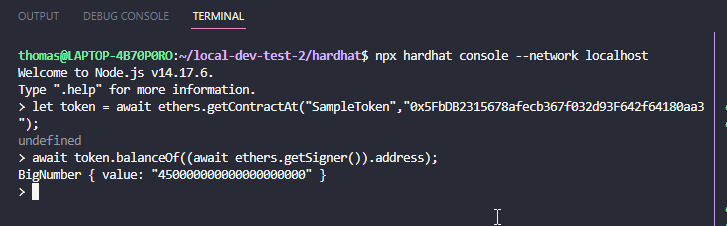
Now we can open the console:
npx hardhat console --network localhost
And then we can interact with the token:
let token = await ethers.getContractAt("SampleToken",<CONTRACT_ADDRESS>);
await token.balanceOf((await ethers.getSigner()).address);
That concludes our Hardhat part. But what about foundry?
Foundry
Foundry is the newest Ethereum development environment. There are a few things that really stand out with foundry compared to hardhat and truffle:
- The dependency management: It's all git submodules instead of npm packages
- The environment is solidity only, no javascript tests
- The EVM implementation is very good for testing
- It's fast. If you like hardhat over truffle because its faster, then you'll love foundry!
How to get started?
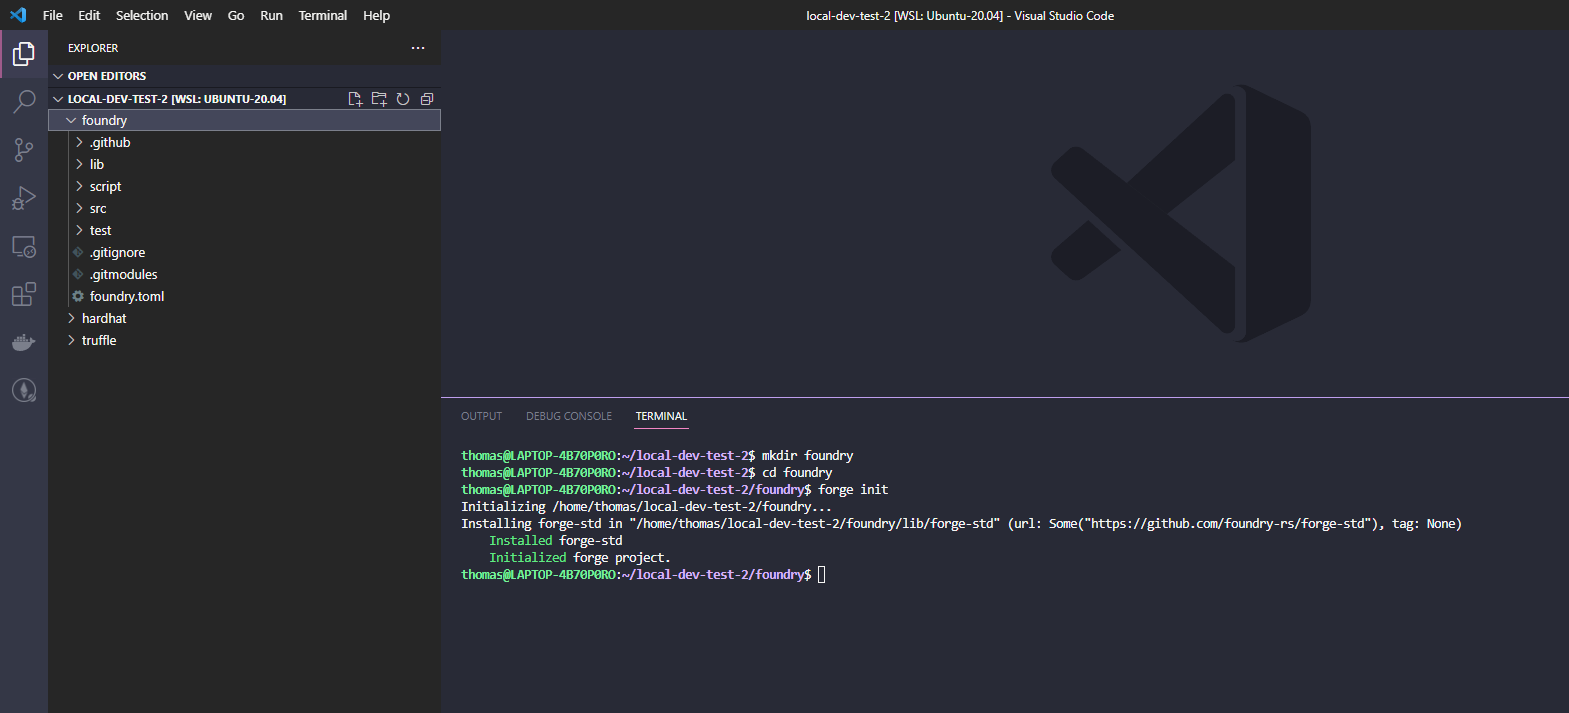
Install foundry from the Book, then simply:
mkdir foundry
cd foundry
forge init
Adding and Compiling Contracts in Foundry
In foundry everything works slightly different:
- the contracts are in "src",
- the external sources are in "lib"
- There is a foundry.toml file, to configure foundry
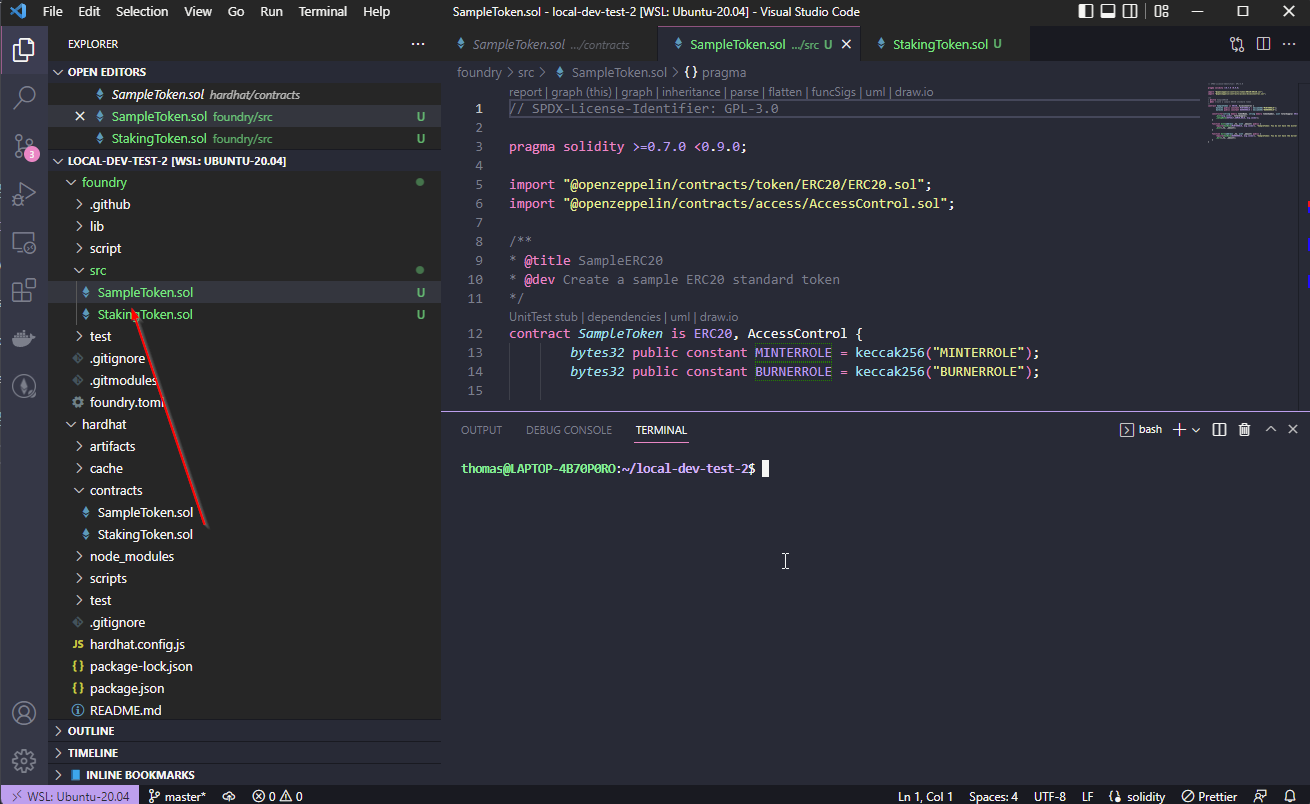
Let's delete the "src/Contracts.sol" file, and add our two contracts. Basically copy them over:
If we type in "forge build" on the terminal, it will error out, because we are still missing the right script to deploy the contract:
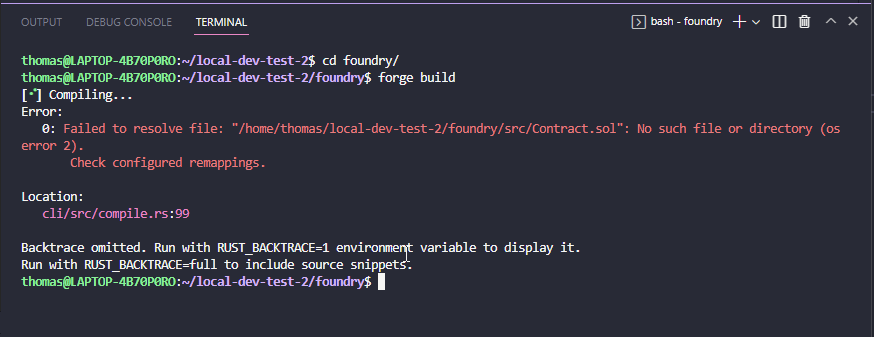
So, we need to configure a script to do that! Delete the script/Contract.s.sol, and instead add a new file called "SampleToken.s.sol":
// SPDX-License-Identifier: UNLICENSED
pragma solidity ^0.8.13;

import "forge-std/Script.sol";

import {SampleToken} from "src/SampleToken.sol";
import {StakingToken} from "src/StakingToken.sol";

contract SampleTokenScript is Script {
    SampleToken token;
    StakingToken staking;

    function setUp() virtual public {}

    function run() public {
        vm.broadcast();
        token = new SampleToken("Sample Token", "TOK", 100 ether);
        staking = new StakingToken("Staking Token", "STA", address(token));

        token.grantRole(token.MINTERROLE(), address(staking));
        token.grantRole(token.BURNERROLE(), address(staking));
    }
}
What if we run forge build now?
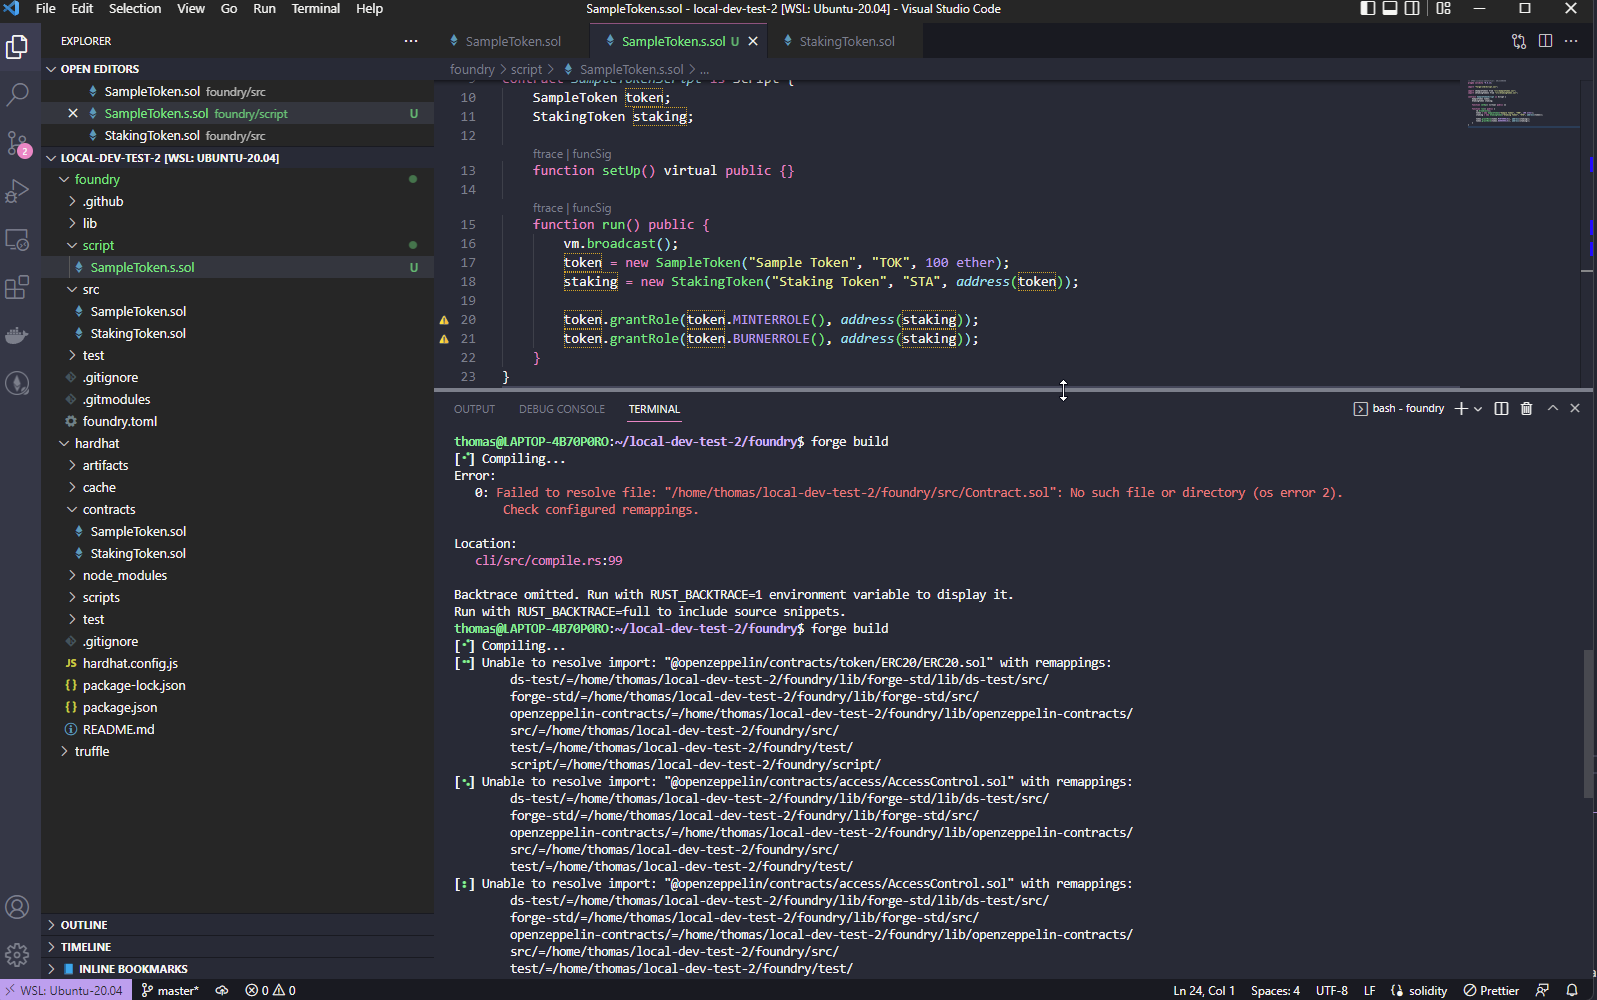
It errors out, because it can't find the openzeppelin contracts!
So, what we have to do is to install the contracts somehow. This time we can't install an npm package (well, technicall we can, but then we'd have to do a remapping, which is too advanced for this course). Let's install the repository for openzeppelin contracts. And before we can do that, we have to commit our changes, because foundry automatically commits those new submodules to the repository:
git add .
git commit -a -m "added contracts"
and then:
forge install openzeppelin/openzeppelin-contracts
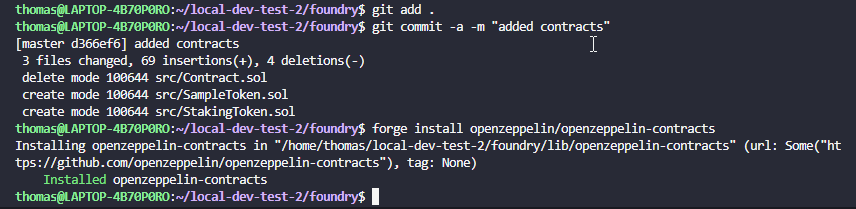
What you will see is the new openzeppelin-contracts repository in the lib folder. And you will see its added as a git submodule (open .gitmodules)!
But if we run forge build, we still get an error:
forge build
Because the contracts have the wrong import! This time its a github repo, not an npm library! The right path is not "@openzeppelin", instead its "openzeppelin-contracts/contracts". So, change the contracts to:
// SPDX-License-Identifier: GPL-3.0

pragma solidity >=0.7.0 <0.9.0;

import "openzeppelin-contracts/contracts/token/ERC20/ERC20.sol";
import "openzeppelin-contracts/contracts/access/AccessControl.sol";

contract SampleToken is ERC20, AccessControl {
        bytes32 public constant MINTERROLE = keccak256("MINTERROLE");
        bytes32 public constant BURNERROLE = keccak256("BURNERROLE");

    constructor(string memory tokenName, string memory tokenSymbol, uint totalSupply) ERC20(tokenName, tokenSymbol) {
        _mint(msg.sender, totalSupply);
        _setupRole(DEFAULT_ADMIN_ROLE, msg.sender);

    }

    function mint(address _to, uint _amount) public {
        require(hasRole(MINTERROLE, msg.sender), "SampleToken: You do not have the minter role");
        _mint(_to, _amount);
    }

    function burn(address _to, uint _amount) public {
        require(hasRole(BURNERROLE, msg.sender), "SampleToken: You do not have the burner role");
        _burn(_to, _amount);
    }
}
// SPDX-License-Identifier: GPL-3.0

pragma solidity >=0.7.0 <0.9.0;

import "openzeppelin-contracts/contracts/token/ERC20/ERC20.sol";
import "./SampleToken.sol";

contract StakingToken is ERC20 {

    uint public deployTimestamp;

    SampleToken sampleToken;
    constructor(string memory tokenName, string memory tokenSymbol, address _sampleToken) ERC20(tokenName, tokenSymbol) {
        deployTimestamp = block.timestamp;
        sampleToken = SampleToken(_sampleToken);
    }

    function stake(uint amountInTok) public {
        uint amountInSta = amountInTok / (((block.timestamp - deployTimestamp) / 1 hours) + 1);
        sampleToken.burn(msg.sender, amountInTok);
        _mint(msg.sender, amountInSta);
    }

    function unstake(uint amountInSta) public {
        uint amountInTok = amountInSta * (((block.timestamp - deployTimestamp) / 1 hours) + 1);
        sampleToken.mint(msg.sender, amountInTok);
        _burn(msg.sender, amountInSta);
    }

    function _beforeTokenTransfer(address from, address to, uint256 amount) override internal {
        require(from == address(0) || to == address(0), "Staking: Transfer is not possible");
        super._beforeTokenTransfer(from, to, amount);
    }
}
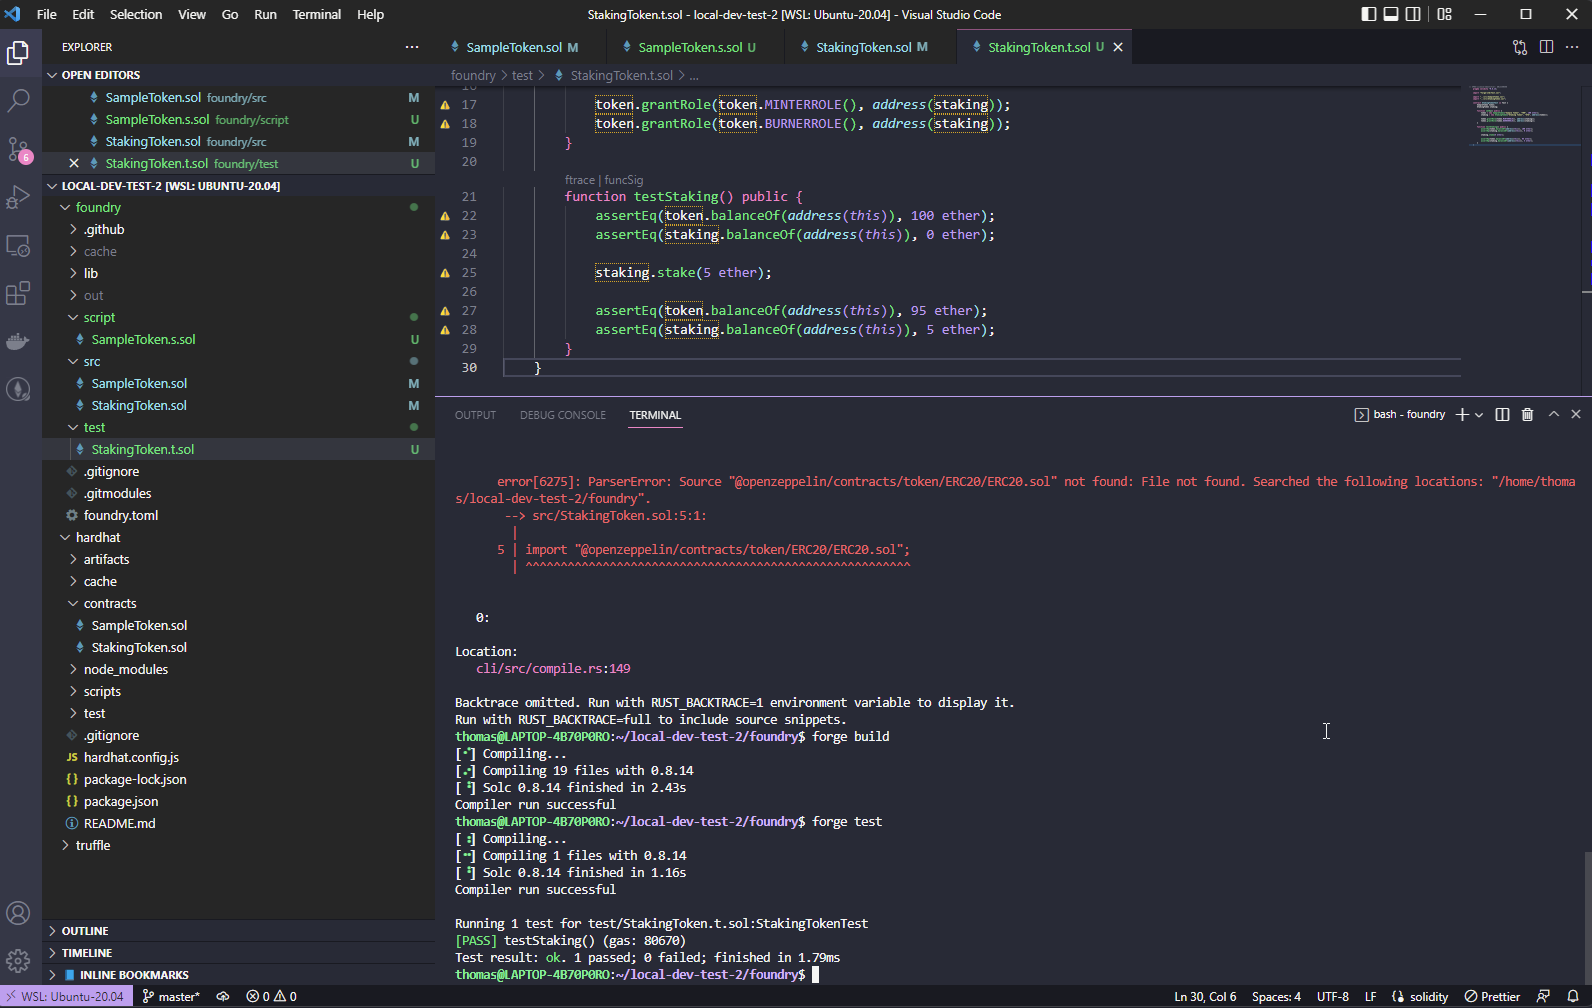
If we type in now forge build it should work:

Awesome! But how do we test this thing now?!
Testing with Foundry
The testing suite with foundry is very good, very complex, and for beginners probably a bit overwhelming. You write tests in solidity. You can change and influence the EVM behavior. You can "prank" the EVM, for example change the msg.sender for a transaction, or the block-height, the timestamp and chain-id. With that you can test scenarios you probably wouldn't be able to test in truffle or hardhat so easily (think multi-chain token-bridges,...). To get started, let's write a simple test-case, nothing too complex, just to see and feel how fast foundry really is.
Let's remove "test/Contract.t.sol" and instead add "test/StakingToken.t.sol":
// SPDX-License-Identifier: UNLICENSED
pragma solidity ^0.8.13;

import "forge-std/Test.sol";

import "../src/SampleToken.sol";
import "../src/StakingToken.sol";

contract StakingTokenTest is Test {
    SampleToken token;
    StakingToken staking;

    function setUp() public {
        token = new SampleToken("Sample Token", "TOK", 100 ether);
        staking = new StakingToken("Staking Token", "STA", address(token));

        token.grantRole(token.MINTERROLE(), address(staking));
        token.grantRole(token.BURNERROLE(), address(staking));
    }

    function testStaking() public {
        assertEq(token.balanceOf(address(this)), 100 ether);
        assertEq(staking.balanceOf(address(this)), 0 ether);

        staking.stake(5 ether);

        assertEq(token.balanceOf(address(this)), 95 ether);
        assertEq(staking.balanceOf(address(this)), 5 ether);
    }
}
Now you can run
forge test
And it should actually test this blazing fast!
Of course, this is just very basic. The testing suite is very powerful, have a look at the Foundry Book!
If you are interested in a real-world speed comparison between foundry and truffle, checkout this (unlisted) video I made a while back: https://youtu.be/Q1brwLUTafE
Summary
In this mini-course you learned how to start a project with remix, truffle, hardhat and foundry. We wrote a mini-test for all of them. And you hopefull got a good grasp on the speed differences between those frameworks.
For me personally, I very much like the migrations-system from truffle. Many developers love hardhat for the scripting, plugins and TypeScript support. I also see a lof of developers go to Foundry now, for speed and ease of use.
Add it to your GitHub!
Whatever you do, don't forget to add a meaningful "Readme.md" to your root-folder of your project and add it to your GitHub, so you have a good reference for future use:
# Solidity Framework Test
In this repo we are testing Truffle, Hardhat and Foundry.

You can run each of those with the respective commands in the sub directories. Do not forget to run npm install in truffle or hardhat before starting!
Foundry is a bit tricky, because it has its own github repostiory. So here's what you can do:
- you create a subdirectoy of the foundry-folder, which will host foundry itself
- you move the lib, src, test, script, etc folders into that sub-directory
- you move hardhat and truffle into the foundry directory
- you adapt the .gitmodules file
cd foundry
mkdir foundry
mv lib foundry
mv script foundry
mv out foundry
mv src foundry
mv test foundry
mv foundry.toml foundry
mv ../hardhat .
mv ../truffle .
Then edit the .gitmodules file:
[submodule "foundry/lib/forge-std"]
    path = foundry/lib/forge-std
    url = https://github.com/foundry-rs/forge-std
[submodule "foundry/lib/openzeppelin-contracts"]
    path = foundry/lib/openzeppelin-contracts
    url = https://github.com//OpenZeppelin/openzeppelin-contracts
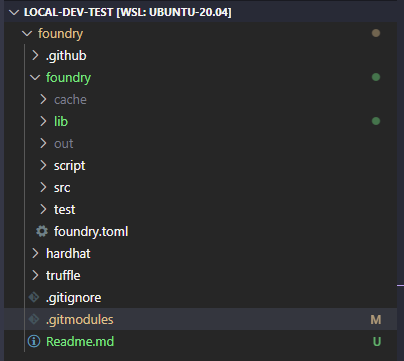
and add the Readme.md into the first-level foundry folder. It should look like this:
Then you can add it to GitHub. Create a new Repository:
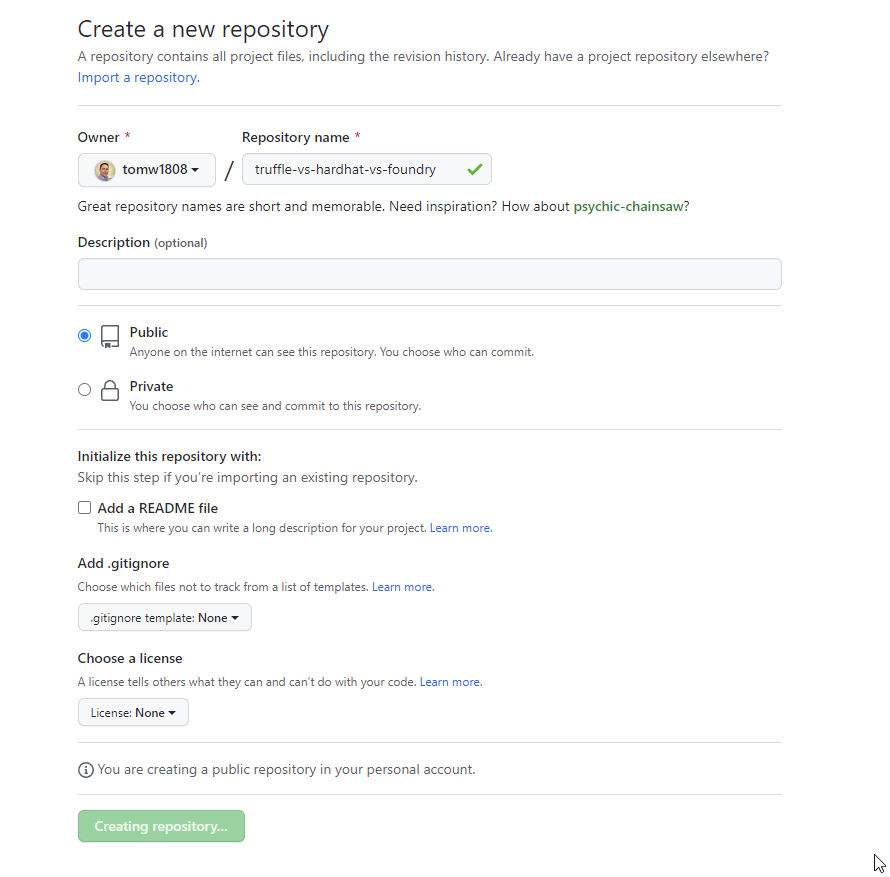
and simply add the repo and push the changes:
git remote add origin git@github.com:<your-repository>.git
git branch -M main
git push -u origin main
The end-result is this: https://github.com/tomw1808/truffle-vs-hardhat-vs-foundry
If you want to keep in the loop, get premium content when it is released, then consider signing up here: https://ethereum-blockchain-developer.com/signup