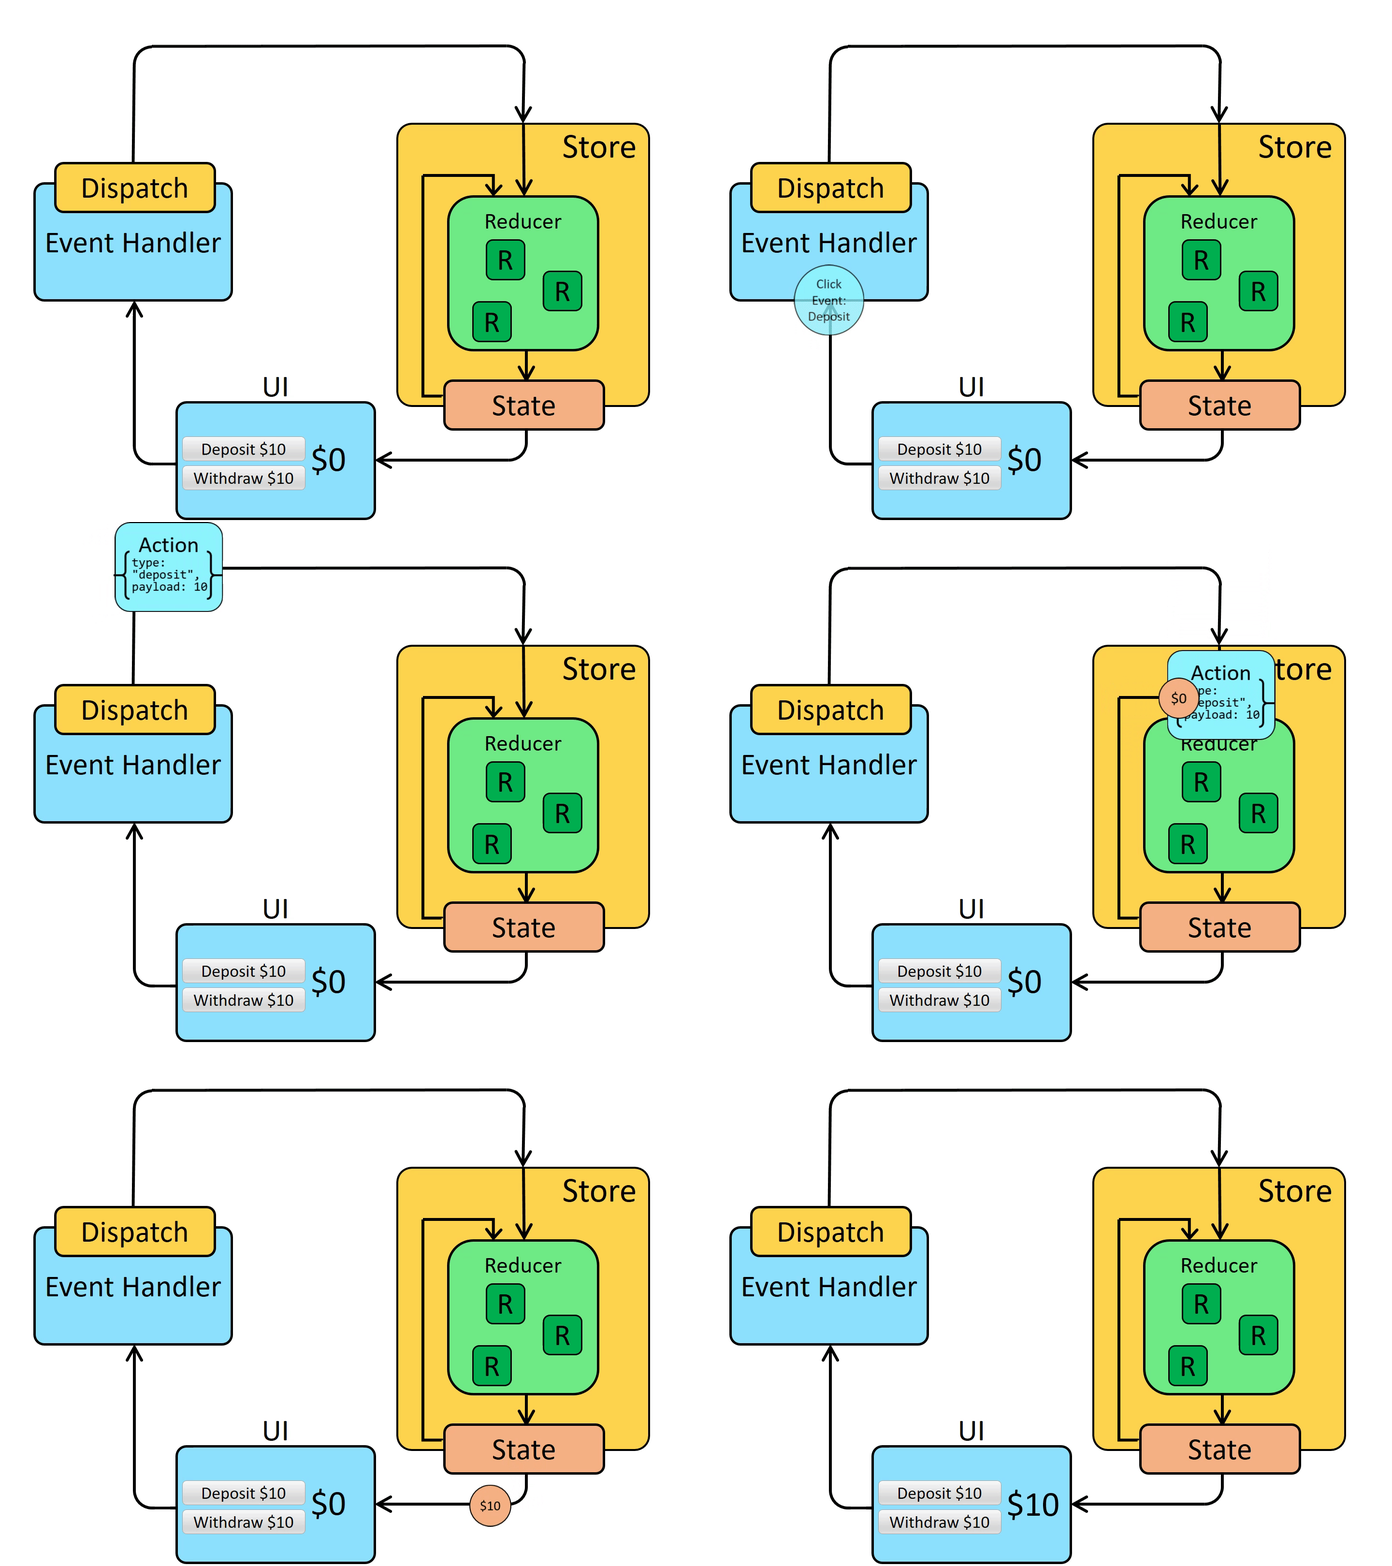
Todo List Store
As you can see, we see our list, but nothing is still functional, and everything is mocked. We now want to make our list functional, at least on client side for now, without saving any data anywhere.
There are a few functionalities we want to add:
-
Adding an item to the list
-
Deleting an item from the list
-
Marking an item as done in the list
Remember that we implemented Redux before in this tutorial and mentioned some terms like reducer, store and other. Now we need to get back to it.
What is a Reducer?
A reducer is a function that determines changes to an application’s state. To simplify, reducer gets instruction on how to change the state, and just changes it to the given values from the instruction.
The other question would be, who sends these instructions to reducer?
Since Redux uses immutable pattern for state changes, meaning that state cannot be changed directly, we need to dispatch some actions that will tell reducer when and how to change the state.
We usually split the actions and reducer into separate files when it comes to Redux.
Lets first create actions for our todo list. In our store folder, lets create a new one called actions.
In newely created folder, lets immediately create todo.ts file where we will define our actions.
As we mentioned above, for now, we will need three actions to add an item, to remove an item and to mark some item as done.
export function addItem(title: string) {
    return {
        type: 'ADD_ITEM',
        title
    }
}

export function removeItem(item_id: number) {
    return {
        type: 'REMOVE_ITEM',
        item_id
    }
}

export function markItemAsDone(item_id: number) {
    return {
        type: 'MARK_ITEM_DONE',
        item_id
    }
}
As you can notice, every of our actions returns object that contains type of action and any other parameters we will need in reducer to change the state.
For example, when adding an item, we need to pass the title to reducer so we can add a new todo item into our state. When we want to remove an item, we will probably send an item id which will be unique for every item so our state knows which item to remove. Also, the same case for marking item as done. We will need item id in the reducer to know which item should be marked as done.
Now when we have our actions, lets make todo.ts reducer inside ./src/store/reducers folder and define state for our todo list.
export interface Todo {
    id: number;
    title: string;
    is_done: boolean;
}

interface TodoReducerInterface {
    todo_list: Todo[]
}

const INITIAL_STATE: TodoReducerInterface = {
    todo_list: []
}

const todoReducer = (state = INITIAL_STATE, action: any) => {
    switch (action.type) {
        default:
            return state;
    }
};

export default todoReducer;
We defined our todoReducer with initial state. The initial state is state that reducer will have everytime we refresh our application.
As we can see, our initial state of todoReducer will be an object that contains todo_list key which will be an empty array, meaning that our todo_list will be empty at the load.
The idea of todo_list is to be a list of todo object that will contain keys id, title and is_done.
For example:
[
 {
  id: 1,
  title: "Todo 1",
  is_done: false
 },
 {
  id: 2,
  title: "Todo 2",
  is_done: true
 }
]
Now lets make reducer catch "ADD_ITEM" action type when it is dispatched and add an item to the list with provided title from the action.
export interface Todo {
    id: number;
    title: string;
    is_done: boolean;
}

interface TodoReducerInterface {
    todo_list: Todo[]
}

const INITIAL_STATE: TodoReducerInterface = {
    todo_list: []
}

const todoReducer = (state = INITIAL_STATE, action: any) => {
    switch (action.type) {
        case "ADD_ITEM":
            return {
                ...state,
                todo_list: [
                    ...state.todo_list,
                    {
                        id: Math.floor(Math.random() * 1000000) + 1,
                        title: action.title,
                        is_done: false
                    }
                ]
            }
        default:
            return state;
    }
};

export default todoReducer;
You notice we use Math.random to generate a random id for now. Later, we will get this id from the database.
Also, lets make reducer handle "REMOVE_ITEMS" and "MARK_ITEM_DONE" action types.
export interface Todo {
    id: number;
    title: string;
    is_done: boolean;
}

interface TodoReducerInterface {
    todo_list: Todo[]
}

const INITIAL_STATE: TodoReducerInterface = {
    todo_list: []
}

const todoReducer = (state = INITIAL_STATE, action: any) => {
    switch (action.type) {
        case "ADD_ITEM":
            return {
                ...state,
                todo_list: [
                    ...state.todo_list,
                    {
                        id: Math.floor(Math.random() * 1000000) + 1,
                        title: action.title,
                        is_done: false
                    }
                ]
            }
        case "REMOVE_ITEM":
            return {
                ...state,
                todo_list: state.todo_list.filter((el: Todo) => el.id !== action.item_id)
            }
        case "MARK_ITEM_DONE":
            const doneItemIndex: number = state.todo_list.findIndex((item: any) => item.id === action.item_id);

            if (doneItemIndex < 0) {
                return state;
            }

            return {
                ...state,
                todo_list: [
                    ...state.todo_list.slice(0, doneItemIndex),
                    {
                        ...state.todo_list[doneItemIndex],
                        is_done: !state.todo_list[doneItemIndex].is_done
                    },
                    ...state.todo_list.slice(doneItemIndex + 1),
                ]
            }
        default:
            return state;
    }
};

export default todoReducer;
We successfully setup our actions and reducer to handle our Redux state, one step we are missing here is to add this todoReducer to our rootReducer so we have access to it.
import { combineReducers } from "redux";
import todoReducer from "./todo";

const rootReducer = combineReducers({
    todo: todoReducer
});

export default rootReducer;
You can notice we added todo key and passed todoReducer to it. It means that when we want to access our todo object in the Redux state from our component we will do something like state.todo.
